Crochet Grapes: Fun DIY Fruit Project for Crafters
As a crafting enthusiast, I've always been captivated by the idea of creating whimsical and functional items with my own two hands.
Recently, I discovered the delightful world of crocheting grapes - a captivating DIY project that combines the art of crochet with the charming allure of yarn-based fruit.
Whether you're a seasoned crochet veteran or a beginner exploring the craft, learning to create these adorable crocheted grapes can be a truly rewarding and enjoyable experience.


In this article, we'll dive into the details of crocheting grapes, from the materials needed to the step-by-step instructions.
You'll learn how to transform simple yarn and a crochet hook into realistic-looking grape clusters that can be used as decorative accents, gifts, or simply for the pure joy of crafting. Get ready to unleash your creativity and add a touch of handmade charm to your home or someone else's with these delightful crochet grapes.
Crochet Grapes: A Delightful Amigurumi Project
Crochet grapes, also known as amigurumi grapes, are a unique and captivating craft that allows you to create delightful, miniature grape-shaped objects.
These charming creations can be used to add a touch of whimsy and personality to your home decor, serving as eye-catching accents or playful additions to your crocheted projects.
What are Crochet Grapes?
Crochet grapes are essentially crocheted, spherical shapes that mimic the appearance of real grapes. By using yarn or thread and a crochet hook, you can meticulously craft these grape-like forms, customizing them in a variety of colors and textures to suit your personal style or complement your existing home decor.
Whether you're looking to create a grape-themed centerpiece, a whimsical garland, or simply a charming addition to your crocheted creations, these delightful crochet grapes offer endless possibilities for crafters and DIY enthusiasts.
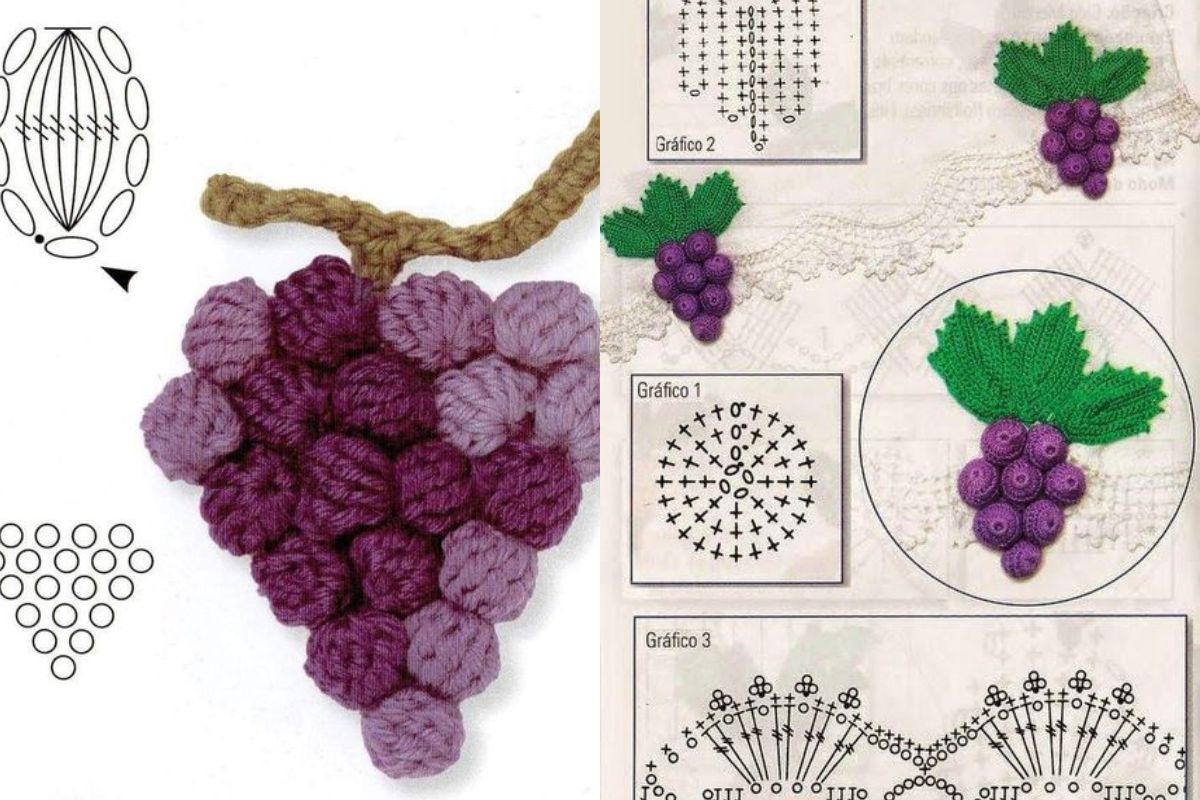
From: www.passionforum.ru
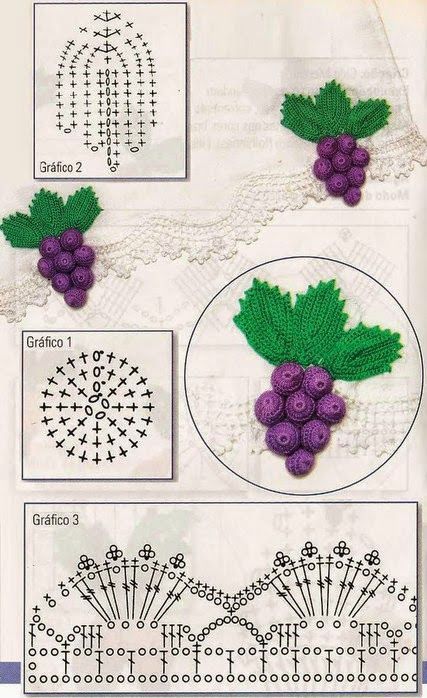
From: lovehandmade2011.blogspot.com
Materials Needed for Crocheting Grapes
To get started with your crochet grapes project, you'll need a few essential materials. First and foremost, you'll need yarn in your desired color(s) – the type of yarn can vary depending on the look and texture you're aiming for, from soft and fluffy to more structured and defined.
You'll also need a crochet hook in the appropriate size to work with your chosen yarn. Additionally, you'll want to have fiberfill or other stuffing material on hand to lend volume and shape to your grape plushies.
Finally, a tapestry needle can be helpful for adding finishing touches, such as attaching stems or adding subtle details to your crocheted grapes.
With these basic supplies, you'll be well on your way to creating your own unique and charming crochet fruit creations. So, let's dive in and explore the delightful world of amigurumi grapes!
Crocheting Grapes: Step-by-Step Instructions
Crocheting your own set of delightful crochet grapes is a fun and rewarding project for crafters of all skill levels. Whether you're looking to create a whimsical home accent or a unique crochet fruit display, the step-by-step instructions in this section will guide you through the process. From the initial foundation to shaping the grape-like form and adding the finishing touches, we'll cover everything you need to know to bring your crochet grapes to life.
To begin, you'll need to choose the right yarn for your project. Soft, supple yarns in shades of purple, green, or a combination of both work best to capture the natural look of grapes. I recommend using a medium-weight yarn that is easy to work with and will hold its shape well. Once you have your yarn, it's time to start crocheting!
Start by creating a small circular base for the first grape using a slip stitch or single crochet technique. As you work your way up, gradually increase the number of stitches to create the grape's rounded shape. Pay close attention to your tension and stitch consistency to ensure a uniform appearance.
Once you've established the shape of the first grape, it's time to move on to the next one. Repeat the same technique, varying the size and placement of each grape to create a natural, cluster-like effect. Remember to leave a small space between each grape to allow for movement and dimension.
As you continue crocheting your grapes, you can experiment with different stitch patterns and textures to add visual interest. Try incorporating bobbles, clusters, or even alternating between single and double crochet stitches to create a more realistic-looking surface.
Finally, don't forget to add the finishing touches. Use a tapestry needle and some contrasting yarn to add small stems and leaves to your crochet grapes, giving them a truly lifelike appearance. With a little patience and creativity, you'll have a beautiful set of crochet grapes that you can proudly display or gift to others.
CHECK MORE CROCHET PATTERNS