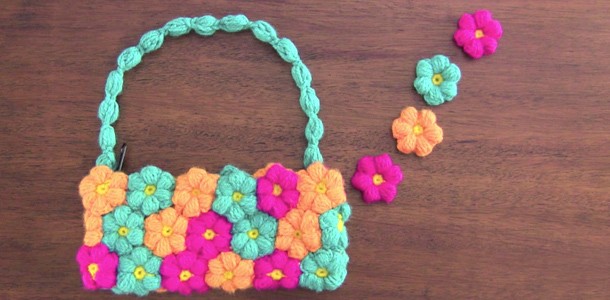
Mollie Bag with Flowers: A Beautiful Crochet Accessory

The Mollie Bag with Flowers is a stylish and functional crochet project that brings together elegance and creativity.
This delightful bag is adorned with delicate crochet flowers, making it a perfect accessory for spring and summer. Whether you’re heading to the beach, a picnic, or a casual day out, this handmade bag adds a playful and charming touch to your outfit.
In this article, we’ll guide you through how to create your own Mollie bag, from selecting the right yarn to crocheting the beautiful flowers that decorate the exterior. Ready to make your own statement bag? Let’s get started!
Mollie Bag With Flowers
Recycle a bag lining with flowers woven crochet Mollie! It can be a purse, pouch, etc.!
Look for Our bag in combination of fuchsia, turquoise, orange and yellow.
This is the tutorial video wallet or purse from a fabric piece to crochet:

Materials and accessories required:
* 50 grams of wool (as for needletacking
4.5 mm.)
* Crochet 4 mm. thick
* Tapestry needle
* scissors
* 1 bag (or cartridge) for recycling
How to Crochet a Mollie Bag with Flowers
1. Start with the Base of the Bag
- Chain for the Base: Begin by chaining 50-60 stitches, depending on how wide you want your bag to be. This will form the bottom base of the bag.
- Single Crochet (SC) in Rounds: Work single crochet (SC) stitches around the foundation chain, working into both sides of the chain to create an oval shape. Continue working in rounds, increasing at the corners to shape the base of the bag.
- Build the Height: Once you’ve completed the base, continue working in rounds of SC to build the height of the bag. Crochet until the bag reaches your desired height (typically 12-15 inches).
2. Create the Bag Handles
- Chain for the Handles: After completing the height of the bag, decide where you want the handles to be. Skip about 10-12 stitches on each side of the bag to leave room for the handles.
- Crochet the Handles: In place of the skipped stitches, create a chain of 20-30 stitches (depending on how long you want the handles to be), then continue crocheting around the bag.
- Strengthen the Handles: After completing one round with the handles, crochet another round of SC, working into the chain stitches to strengthen the handles.
3. Crochet the Flowers
- Start the Flowers: For the decorative flowers, start by creating a magic ring or chain 4 stitches and slip stitch to form a circle.
- Work the Petals: Into the center of the circle, work a series of double crochets (DC) or treble crochets (TC) to form the petals. You can make 5-6 petals for each flower, depending on your preference.
- Make Multiple Flowers: Crochet multiple flowers in different sizes and colors to add variety to your bag. You can also experiment with different types of crochet flowers for a more textured look.
4. Attach the Flowers to the Bag
- Position the Flowers: Lay out the flowers on your bag to decide on the placement. You can create a cluster of flowers in one corner or scatter them around the entire bag.
- Sew the Flowers: Using your yarn needle, carefully sew the flowers onto the bag, making sure they’re securely attached. You can also add leaves or small vines to complement the flowers.
- Add Extra Embellishments (Optional): For added detail, sew buttons or beads into the center of each flower, or embroider around the flowers for extra flair.
Crocheting a Mollie Bag with Flowers is a fun and creative project that results in a beautiful, functional accessory. Whether you’re using the bag for casual outings, beach trips, or as a fashionable statement piece, this handmade item will surely turn heads.
The combination of a simple crochet base and decorative flower accents makes this project both practical and elegant. Ready to create your own stylish Mollie bag?
CHECK MORE CROCHET PATTERNS