How to Crochet Cute Earmuffs: A Cozy DIY Guide
Winter is the perfect season for warm, cozy accessories, and crocheted earmuffs are no exception! Not only do they keep your ears toasty during those chilly days, but they also add a dash of style to any winter outfit. With just a bit of yarn and a crochet hook, you can make your own pair of cute earmuffs that are uniquely yours.
In this guide, we'll walk you through the process of crocheting adorable earmuffs, including the materials you need, the basic steps, and some creative ways to personalize them.
Ready to get started? Let’s dive into this cozy craft project!
Crochet Your Own Earmuffs
Choose your favorite colors and embellishments to match your personal style.
Crocheting your own earmuffs is much cheaper than buying designer ones.
There's something special about wearing handmade accessories. It's a craft filled with love and care!
Learn how to crochet cute earmuffs with this easy DIY guide! Discover materials, patterns, and creative tips to make cozy and stylish earmuffs for winter.
Materials Needed for Crocheting Earmuffs
Before you begin, make sure you have these materials on hand:
- Yarn: Opt for a soft, warm yarn, such as wool or acrylic. Thick yarn works best for extra coziness.
- Crochet Hook: A size 5.0mm to 6.0mm hook is ideal for this project.
- Headband: Use a sturdy plastic or metal headband as the base.
- Stuffing: Polyester fiberfill or cotton stuffing to make the earmuffs plush.
- Yarn Needle: For sewing pieces together and weaving in ends.
- Scissors: To cut the yarn as needed.
 | in-depth tutorial for all yarn types")
Step-by-Step Guide to Crochet Cute Earmuffs
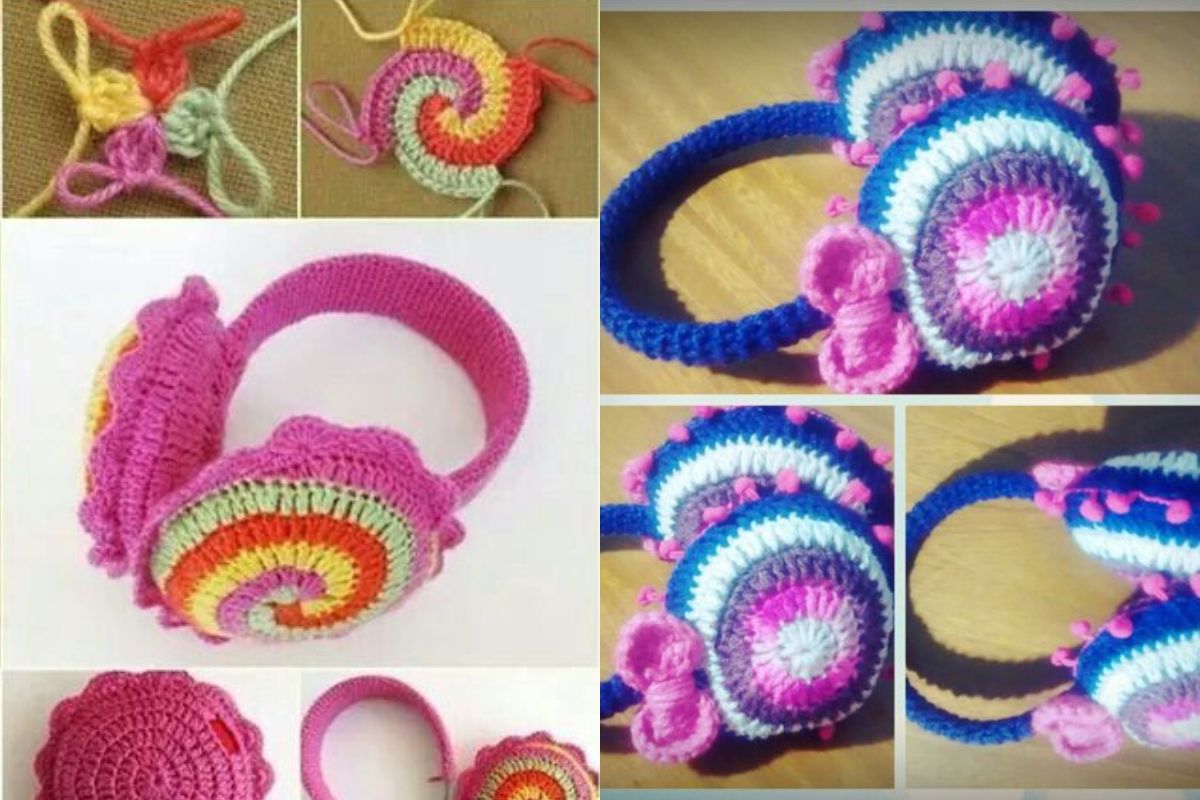
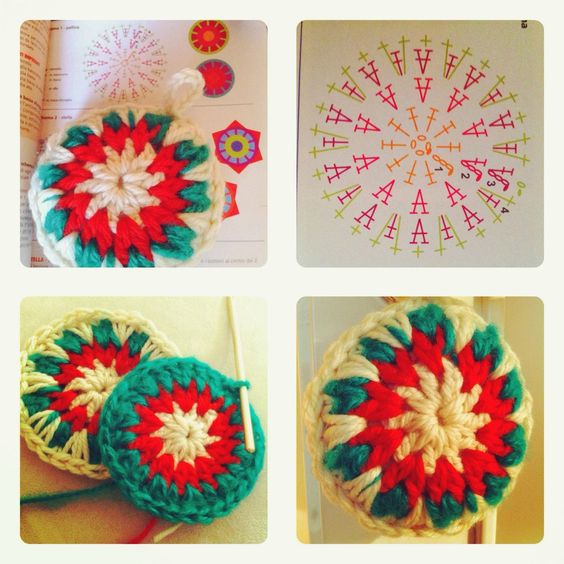
1. Creating the Earmuff Circles
The earmuffs are essentially two crocheted circles that will be attached to a headband. Here’s how to crochet each circle:
- Start with a Magic Ring: Create a magic ring and crochet 6 single crochets (SC) into the ring.
- Round 1: Pull the ring tight and join with a slip stitch. Chain 1.
- Round 2: Crochet 2 SC in each stitch around (12 stitches). Join with a slip stitch, chain 1.
- Round 3: 1 SC in the first stitch, 2 SC in the next stitch; repeat around (18 stitches). Join with a slip stitch.
- Round 4: 1 SC in the first 2 stitches, 2 SC in the next stitch; repeat around (24 stitches).
"Continue increasing the size of the circle until it’s large enough to cover your ear comfortably."
- Pro Tip: If you want a thicker earmuff, crochet more rounds without increasing the number of stitches.
2. Adding Padding to the Earmuffs
Once you have two crocheted circles, it's time to add stuffing:
- Place a small amount of stuffing in the center of one circle.
- Lay the second circle on top and crochet around the edges to join them, creating a puffy, plush earmuff.
- Tip: Use enough stuffing to make the earmuffs cozy, but not so much that they become bulky and heavy.
3. Attaching Earmuffs to the Headband
Now that you have your two earmuffs, it’s time to attach them to the headband:
- Position the earmuffs on each side of the headband, aligning them with where they will cover your ears.
- Use your yarn needle and leftover yarn to sew the earmuffs onto the headband securely.
- Alternative Method: For a removable option, crochet small loops on the earmuffs that can slide onto the headband.
4. Personalizing Your Earmuffs
Now for the fun part—customizing your earmuffs! Here are some ideas:
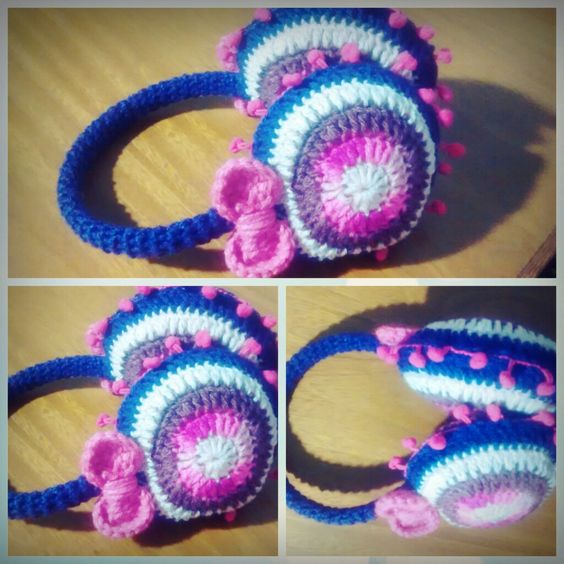
- Add a Pop of Color: Use different yarn colors for each layer of the earmuff circles for a striped effect.
- Embellishments: Attach crochet flowers, bows, or pom-poms to the earmuffs for an extra cute look.
- Fuzzy Yarn: Use a fluffy yarn, like faux fur or chenille, for a cozy, soft texture.

From Pinterest
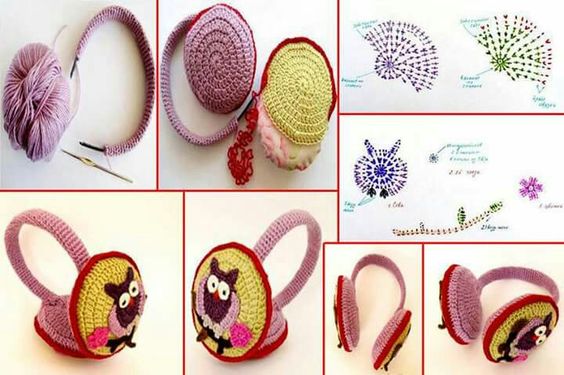
Crochet Patterns for Different Earmuff Styles
If you're looking to get a bit more creative with your crochet earmuffs, try these variations:
- Heart-Shaped Earmuffs: Instead of circles, crochet heart shapes and follow the same steps to stuff and attach them to the headband.
- Animal-Themed Earmuffs: Use color combinations and add small ears (like cat ears or bear ears) to the top of the earmuffs for a playful twist.
- Lacy Earmuffs: For a more delicate design, crochet a lace pattern over the earmuff circles using thinner yarn and a smaller hook.
Crocheting your own cute earmuffs is a rewarding project that combines creativity, practicality, and warmth. With just a few materials and a bit of time, you can craft a stylish winter accessory that reflects your unique style. Plus, they make for fantastic, heartfelt gifts during the colder months.
So grab your crochet hook, choose your favorite yarn colors, and start making those adorable earmuffs!
CHECK MORE CROCHET PATTERNS