Crochet Witch Hat: Easy Halloween Ideas, Styling Tips and Customization


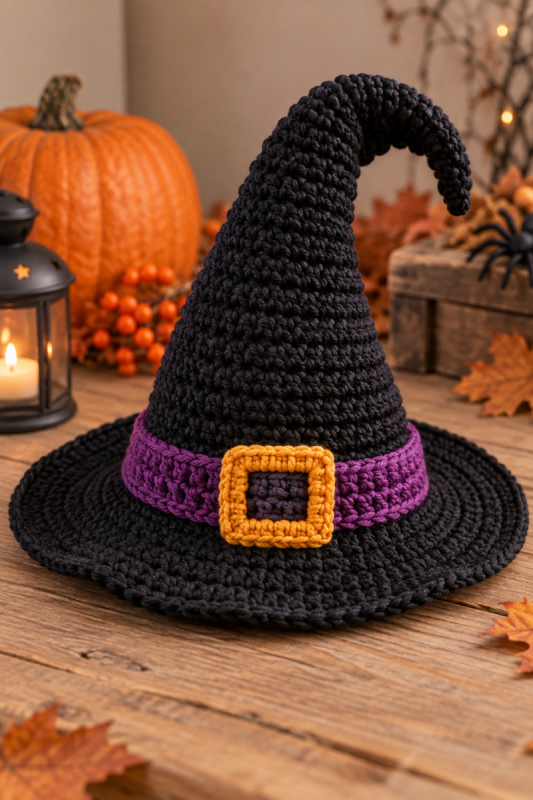
A crochet witch hat is one of those Halloween projects that can change personality completely with just a few stitches and a different ball of yarn. Make it black with a crooked tip and it feels wonderfully traditional. Work it in purple with a bright orange band and suddenly it becomes playful. Choose moss green, add a dark belt and a buckle, and the same basic shape takes on an almost storybook quality.
There are plenty of Halloween decorations that disappear into a storage box after one evening. A handmade witch hat feels different.
It can become part of a costume, but it can also be used as:
- Halloween home décor
- a pumpkin topper
- a witch doll accessory
- a table centerpiece
- a photo prop
- a seasonal shelf decoration
- a child or adult costume accessory
- an ornament when made in miniature

Crochet also gives the hat texture that inexpensive costume fabric simply cannot imitate.
A slightly uneven brim? Good.
A tip that bends dramatically to one side? Even better.
A witch hat does not need to look perfectly manufactured. Its imperfections are often what give it character.
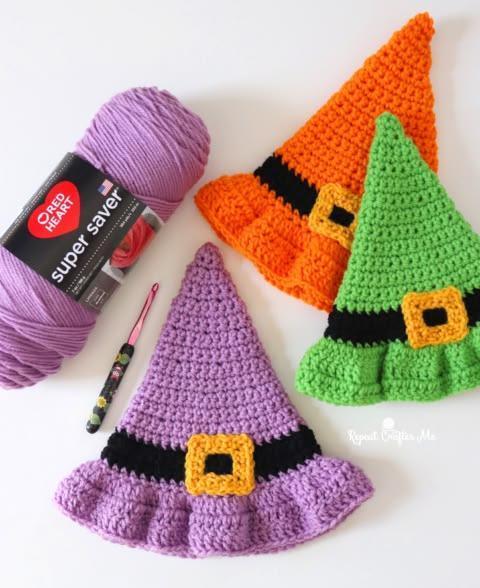
Pattern repeatcrafterme
Materials for a Crochet Witch Hat
The exact amount of yarn depends on the size, but the basic supplies remain simple.
You will generally need:
- medium, bulky or super-bulky yarn
- an appropriate crochet hook
- stitch markers
- scissors
- a yarn needle
- optional contrasting yarn for the band
- optional yarn for a buckle or appliqués
For a wearable hat, yarn selection matters.
A very soft, floppy yarn can create a beautifully slouchy witch hat, while a firmer yarn gives the cone more structure. Bulky yarn can also produce a substantial shape quickly.
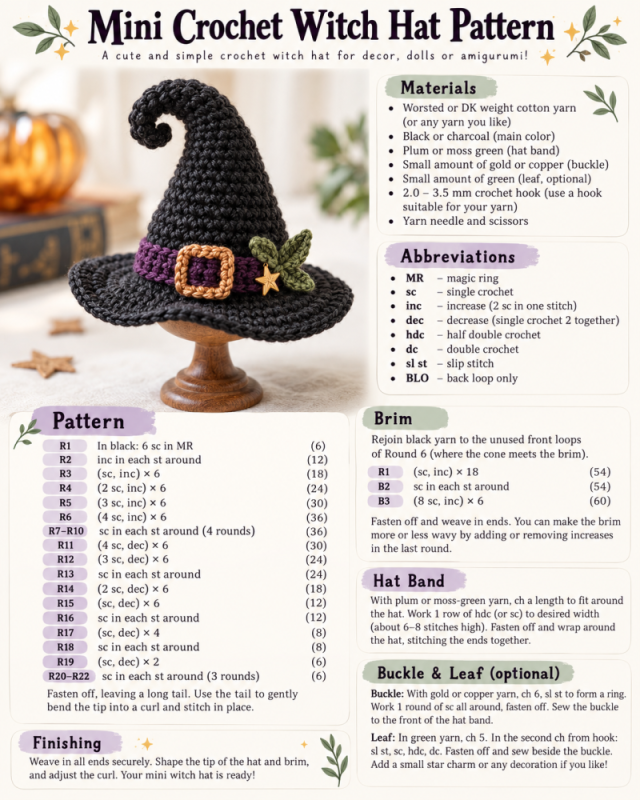
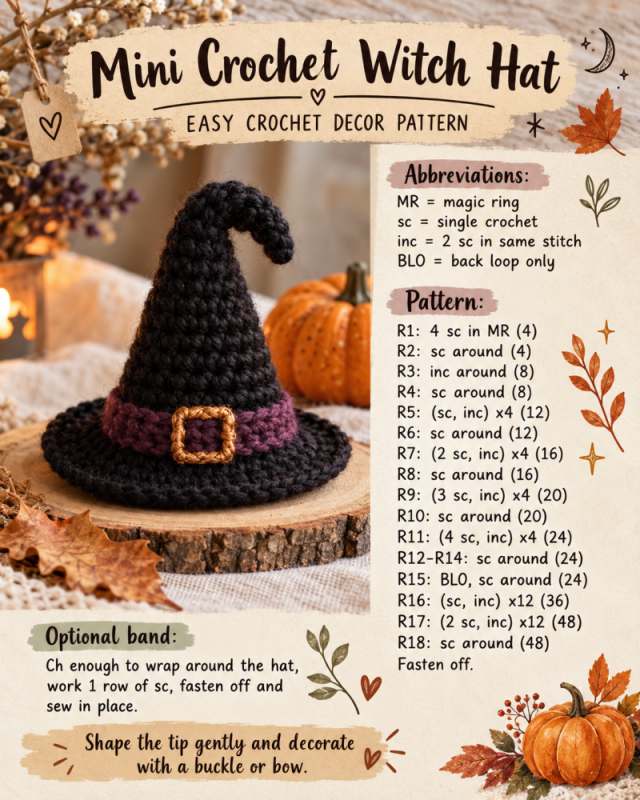
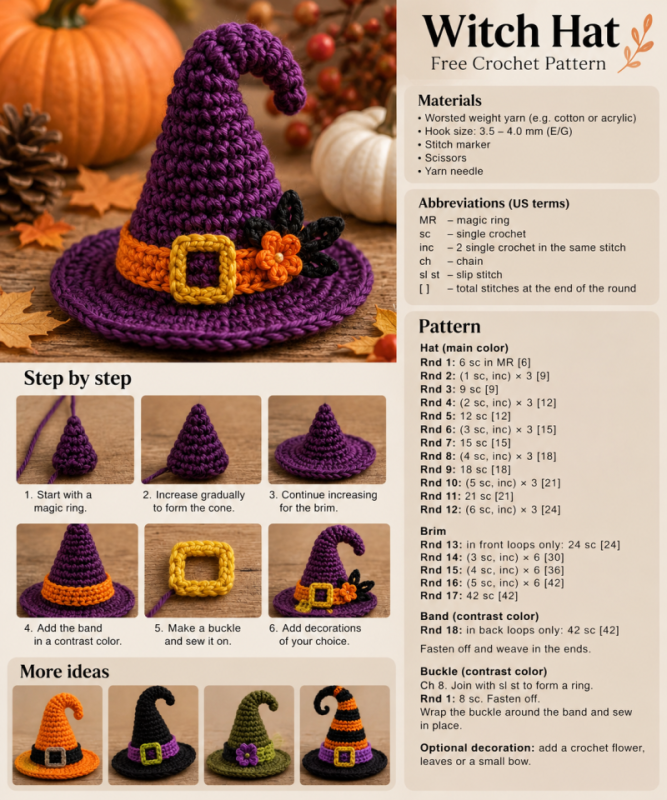
Understanding the Basic Witch Hat Shape
A crochet witch hat looks complicated because of its dramatic silhouette, but its geometry is fairly straightforward.
Think of it as three sections:
Point → Cone → Brim
The pointed crown begins very small. Gradual increases make the cone wider as you work downward. Once the crown has enough circumference, the crochet changes direction and expands more aggressively to form the brim.
Spacing increases consistently helps prevent the cone from becoming unexpectedly lopsided.
Do not worry if the tip naturally bends.
For Halloween, that can be an advantage.
Step 1: Begin at the Point
Many witch hats begin at the very top and work downward in rounds.
A magic ring is a convenient starting technique because it allows the opening at the tip to close neatly.
Begin with a small number of stitches and work several rounds while slowly introducing increases.
The important word is slowly.
Too many increases too quickly produce something closer to a bowl than a tall pointed hat.
Step 2: Build the Cone
Continue crocheting in rounds, alternating between plain rounds and increase rounds according to the shape you want.
Try the crown on periodically if you are making a wearable version.
The cone should eventually become wide enough to sit comfortably around the head without stretching aggressively.
Use a stitch marker at the beginning of each round. When a project becomes larger, losing the beginning of the round is surprisingly easy.
For a whimsical appearance, allow the upper section to remain relatively narrow for longer.
That creates the exaggerated, tall point associated with classic witches.
Step 3: Create the Brim
This is where the hat suddenly comes alive.
Instead of continuing downward, the fabric needs to move outward.
Crocheting through one loop in a transition round can help create a subtle ridge and encourage the brim to change direction; this technique appears in several contemporary witch-hat constructions.
Then increase more frequently.
A few additional rounds can transform a modest brim into something dramatically theatrical.
Small brim
Best for children, dolls or a simple costume.
Medium brim
Comfortable and practical for most wearable Halloween hats.
Oversized brim
Perfect when the hat itself should become the main feature of the costume.
Add a Contrasting Hat Band
The simplest way to make a plain witch hat look finished is to add a band around the base of the cone.
Black on purple looks dramatic.
Orange on black feels unmistakably Halloween.
Try something less predictable too:
- mustard on dark brown
- burgundy on charcoal
- sage green on black
- antique gold on plum
- cream on forest green
Crochet the band separately or incorporate a contrasting stripe directly into the hat.
Make a Crochet Buckle
A buckle instantly gives the project that recognizable fairy-tale witch aesthetic.
Use yellow, mustard or metallic-looking yarn.
Instead of filling the shape completely, crochet or embroider a simple rectangular outline and position it at the front of the band.
Keep it slightly oversized if you want a playful appearance.
A perfectly symmetrical buckle is unnecessary.
This is a witch hat, not formal millinery.
Creative Crochet Witch Hat Variations
Once you understand the silhouette, one pattern concept can become an entire Halloween collection.
Pumpkin Witch Hat
Start with orange yarn.
Add a green band and create a simple jack-o'-lantern expression on the cone.
Black crochet details can form triangular eyes and a crooked smile.
Frankenstein Witch Hat
Use bright or muted green for the main hat.
Add a black brim or band and small stitched details resembling scars.
The result becomes part hat, part Halloween character.
Witch Cat Hat
Add triangular crochet ears, eyes and whisker details.
The concept works especially well for children because the hat becomes more like a character costume than a traditional witch accessory. A cat-themed variation is also among the customization ideas associated with the referenced witch-hat design.
Striped Witch Hat
Alternate black, orange, purple and green.
Keep the stripes narrow near the tip and wider toward the bottom for an intentionally irregular appearance.
Elegant Gothic Witch Hat
Skip bright Halloween colors completely.
Use black, charcoal or deep burgundy yarn.
Decorate the band with crochet roses, lace-inspired motifs or a restrained dark bow.
The result can feel far more sophisticated than novelty Halloween décor.
How to Create a Crooked Witch Hat Tip
A perfectly upright point is not always the most interesting choice.
Once the crown is finished, gently bend the upper section to one side.
Depending on the yarn and construction, blocking may be enough to encourage the shape.
For decorative hats, you can also create the impression of a bend simply by working the tip slightly longer and allowing it to fold naturally.
A soft curve usually looks better than an abrupt right angle.
Final Thoughts
The best crochet witch hat is rarely the one that looks most perfect.
Let the point bend.
Make the buckle slightly oversized. Mix colors you would not normally combine. Add a pumpkin face, a cat motif or an unexpectedly elegant band.
Once the basic cone and brim construction makes sense, the project becomes a blank canvas.
That is where the fun really begins.
One pattern idea can produce a classic black witch hat, a playful orange Halloween version, a gothic burgundy design or a whimsical green character hat.
Same basic shape.
Completely different personality.

CHECK MORE CROCHET PATTERNS