Beautiful crochet napkin border ideas
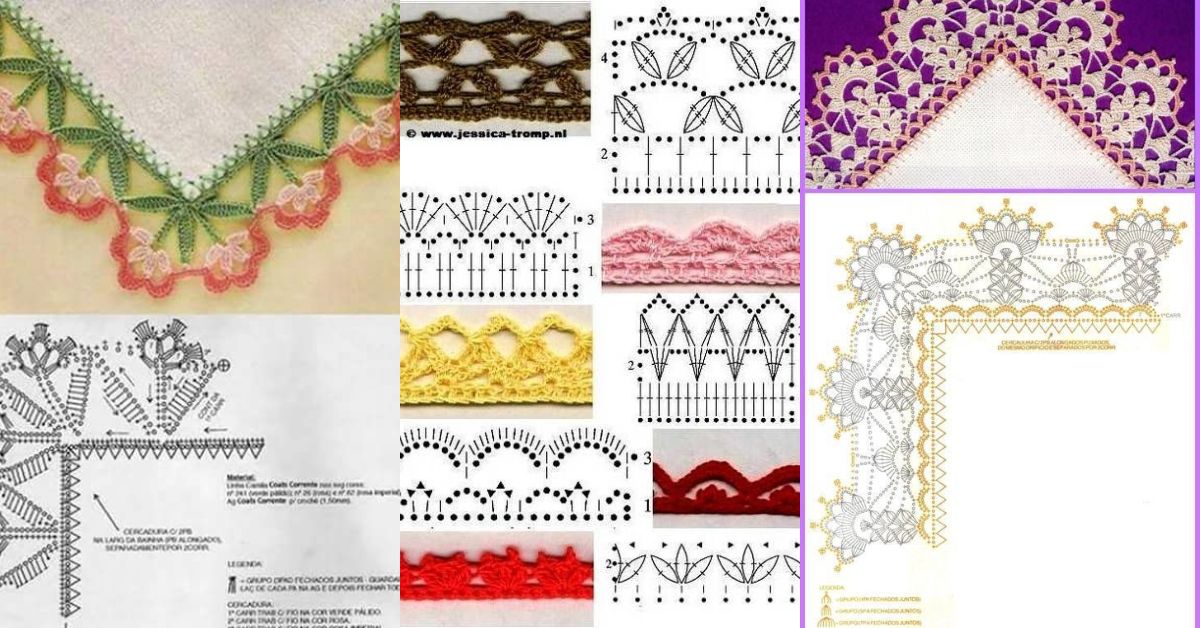
Fabric napkins continue to be at the top of preferences for those who like to make a beautiful and decorated table. Some people use fabric napkins all year round, others only on special occasions like Valentine's dinner, Christmas, Easter.
Today we show you some crochet border ideas to give your napkins more beauty and personality.
To help with this task, we separate some graphics. There are options for all tastes and styles.
Crochet napkin borders
Crochet napkin borders are the perfect option to give your napkins a more delicate style.
As well as using them on your napkins, these are also perfect to give to someone special.
Simpler or more elaborate, be sure to experiment.
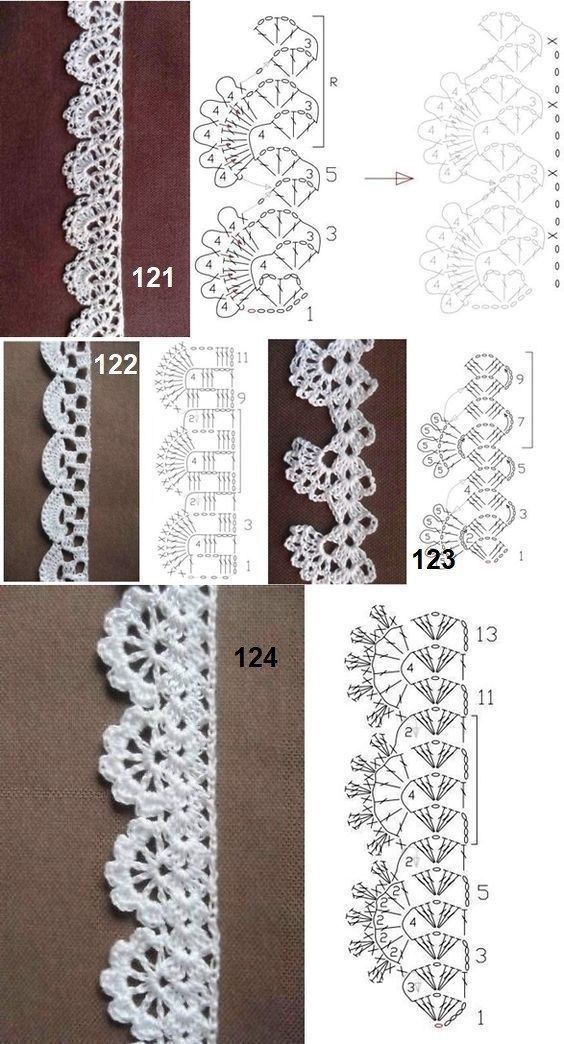
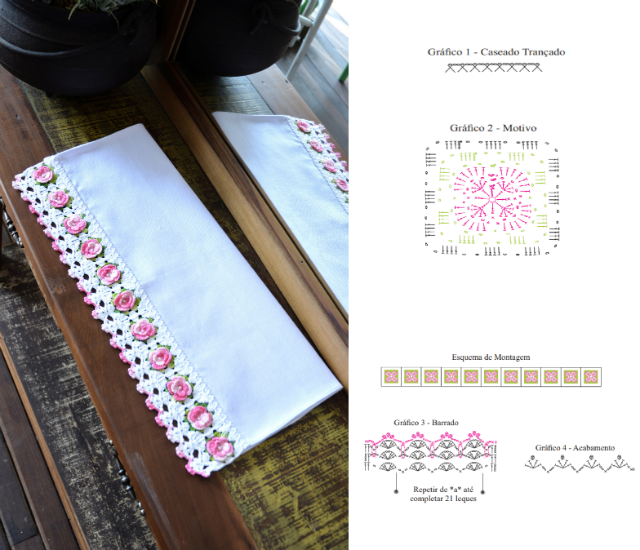
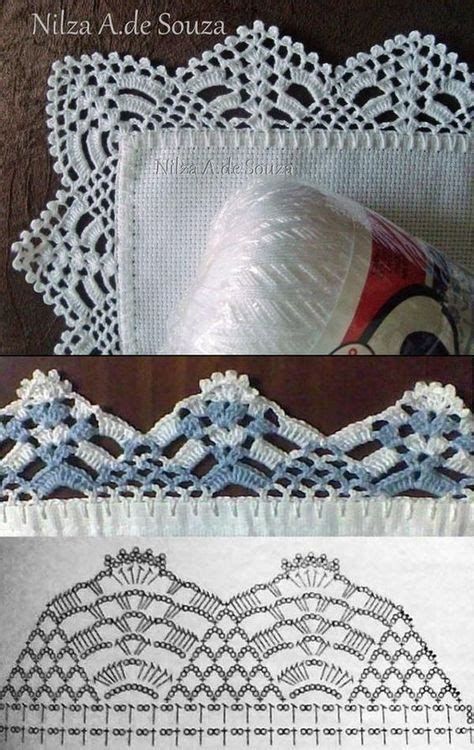
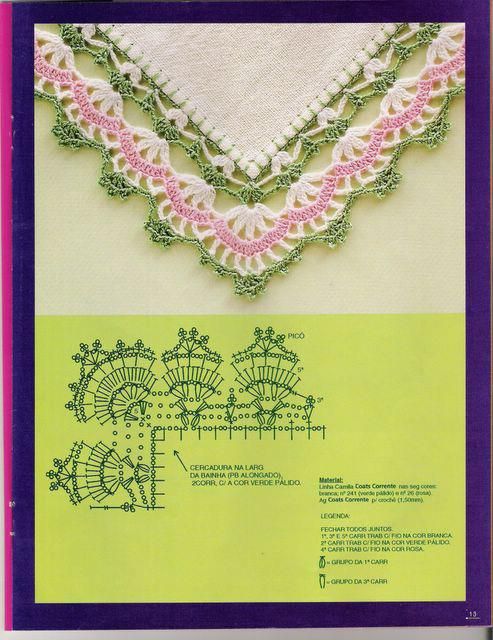
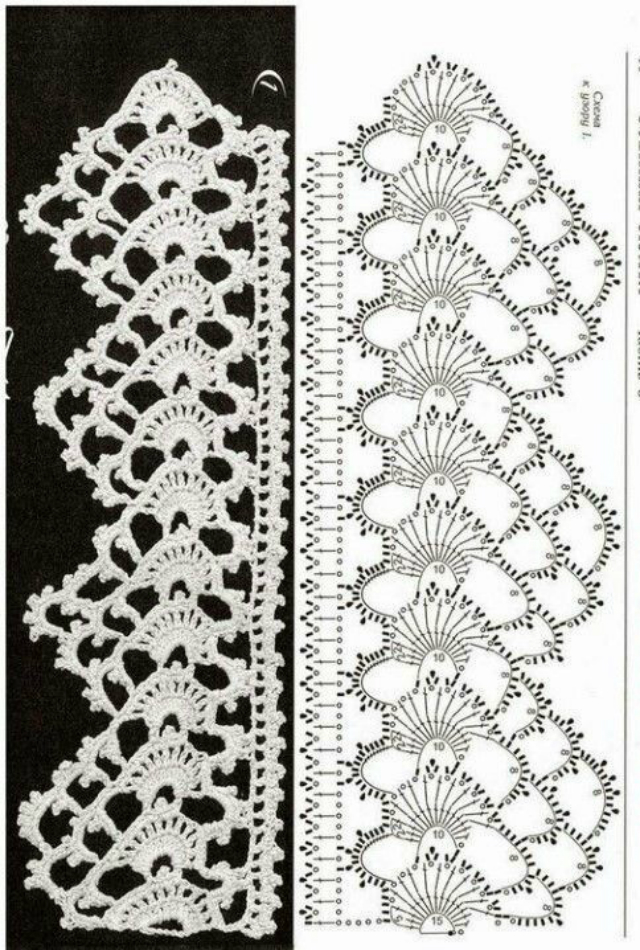
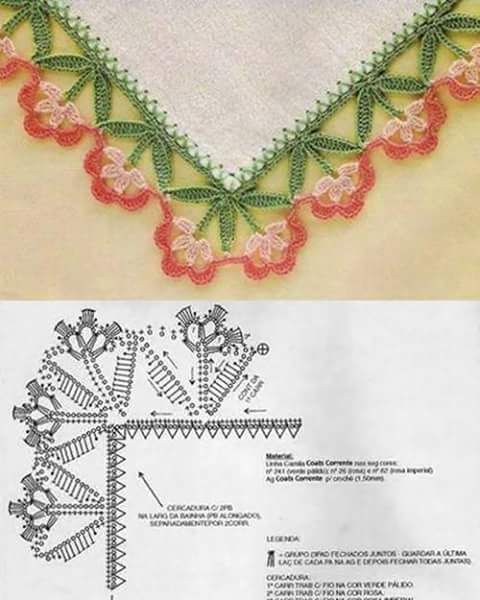
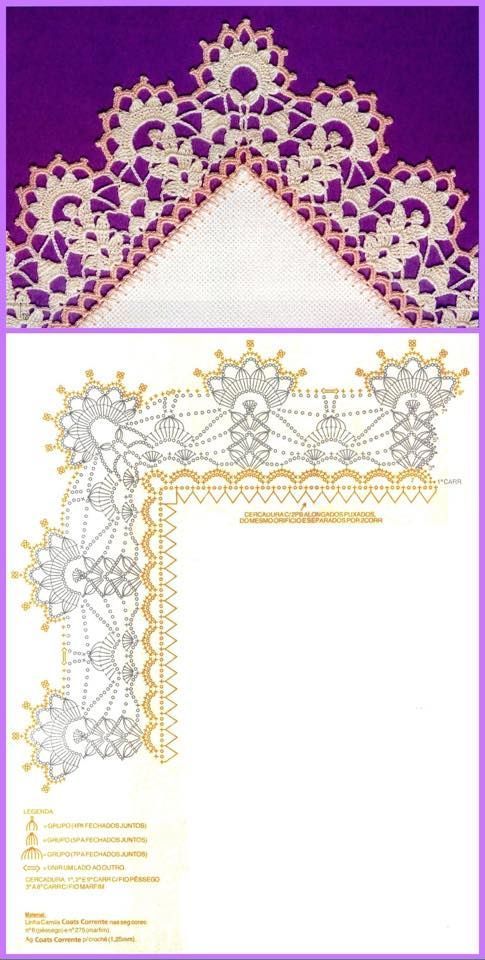
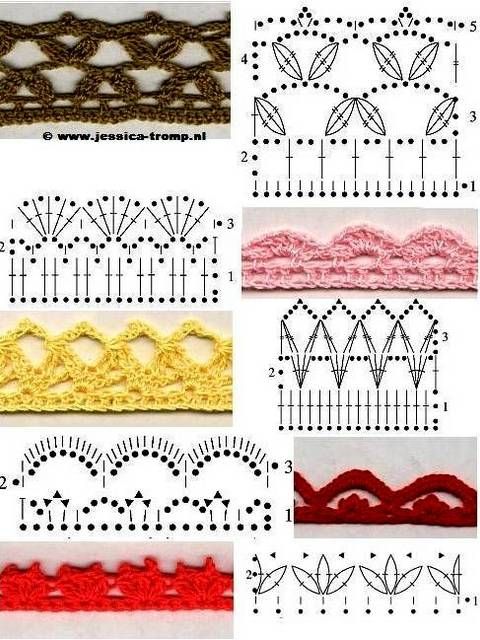
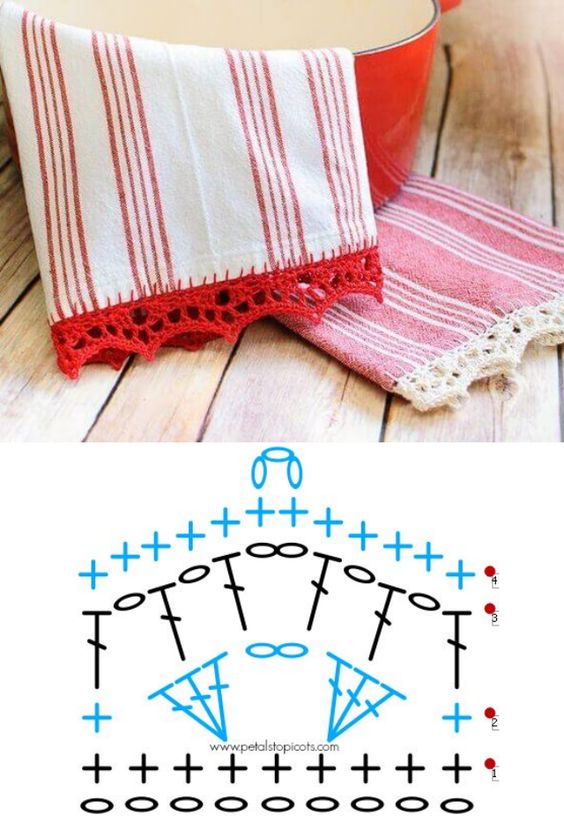
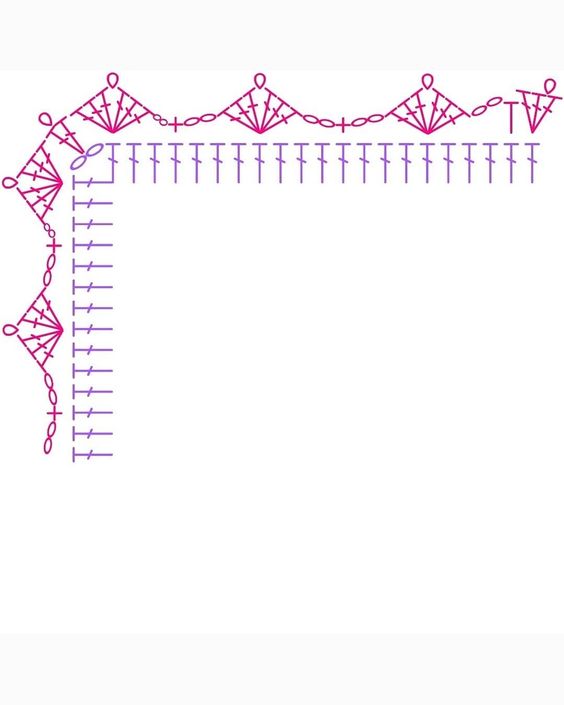
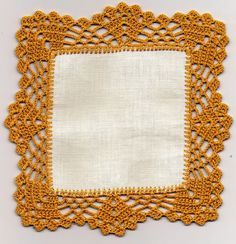
Pinterest.
Materials You Will Need
Before you start crocheting your napkin borders, gather the following materials:
- Yarn: Choose cotton yarn in colors that complement your napkins. Cotton is preferred for its durability and ease of care.
- Crochet Hook: A size G (4mm) or H (5mm) hook is generally recommended for medium-weight yarn.
- Napkins: Use fabric napkins made from cotton, linen, or blends for best results.
- Scissors: For trimming yarn ends.
- Tapestry Needle: To weave in loose ends and finish your work.
Basic Crochet Techniques for Napkin Borders
Before starting your crochet project, familiarize yourself with some basic crochet stitches that will be useful for creating borders:
- Chain Stitch (ch): The foundation of most crochet projects.
- Single Crochet (sc): Creates a tight fabric, useful for the base of the border.
- Double Crochet (dc): Adds height and volume to your work, often used in decorative borders.
- Slip Stitch (sl st): Used for joining rounds and securing your work.
- Shell Stitch: A decorative stitch that adds texture and flair.
Sample Stitch Pattern: Basic Napkin Border
To get you started, here’s how to create a basic crochet border for your napkins:
Materials Needed
- Yarn in your chosen colors.
- Crochet hook (size G or H).
- Scissors and tapestry needle.
- Fabric napkins.
Instructions
- Prepare the Napkin: Lay the napkin flat and choose a corner to start your crochet border.
- Attach Yarn: Use a slip knot to attach your yarn at the desired starting point. You may want to start at the corner for a neater finish.
- Round 1: Chain 1, then work 1 sc into each side of the napkin, ensuring to work 3 sc in each corner to allow for smooth curves.
- Round 2: Continue working in a pattern (such as dc or shell stitch) around the edges, creating a decorative border. You can choose to alternate stitches for added texture.
- Finish Off: Once you reach the starting point, join with a slip stitch, cut the yarn, and weave in any loose ends.
Step-by-Step Instructions for Crocheting Napkin Borders
Now that you’re familiar with the basic stitch patterns, let’s dive deeper into the step-by-step process of creating your crochet napkin borders.
Step 1: Choose Your Napkin
- Select Fabric Napkins: Choose fabric napkins that suit your dining style. Cotton or linen napkins work well for crochet borders.
Step 2: Prepare the Yarn
- Choose Colors: Select yarn colors that complement the napkin fabric. Consider using contrasting colors for a bold statement.
Step 3: Attach the Yarn
- Starting Point: Start at one corner of the napkin, making a slip knot to attach the yarn.
Step 4: Create the Base
- Single Crochet Base: Work a single crochet stitch along the edges of the napkin, ensuring to cover the edges evenly. For corners, make 3 single crochet stitches in the same space to allow the fabric to curve.
Step 5: Add Decorative Elements
- Choose a Decorative Stitch: Once you have your base established, switch to a decorative stitch for the border. Shell stitches, scallops, or picots can add lovely detail.
- Shell Stitch Example: Work 5 dc in the same stitch, skip 2 stitches, 1 sc in the next to create shell shapes.
Step 6: Finish the Border
- Complete the Round: Continue working your decorative stitches around the entire napkin. When you reach the starting point, join with a slip stitch.
- Weave in Ends: Use a tapestry needle to weave in any loose yarn ends.
Creative Ideas for Crochet Napkin Borders
Now that you’ve crafted your crochet napkin borders, consider these creative ideas for personalizing them:
1. Color Combinations
- Ombre Effect: Use different shades of the same color for a beautiful ombre effect along the edges.
- Rainbow Borders: Incorporate multiple colors to create a fun and playful border.
2. Themed Designs
- Seasonal Themes: Use colors and motifs that reflect the seasons, such as autumn leaves or spring flowers.
- Character Themes: Create borders that incorporate favorite characters or hobbies for kids’ napkins.
3. Functional Features
- Pockets: Consider adding small pockets for utensils or napkin rings to the corners of the napkins.
- Reversible Designs: Use different crochet patterns on each side for a versatile look.
Styling Tips for Your Crochet Napkin Borders
Here are some tips for showcasing your beautifully bordered napkins:
1. Table Settings
- Coordinate with Dishware: Choose plates, glasses, and utensils that complement the colors in your napkin borders for a cohesive table setting.
- Centerpieces: Use decorative centerpieces, like vases of fresh flowers, to enhance the overall look of your dining experience.
2. Seasonal Decor
- Bright Colors for Summer: Opt for vibrant colors that celebrate summer gatherings.
- Cozy Designs for Fall/Winter: Choose warm, rich tones that create a cozy atmosphere for family meals.
3. Casual or Formal Settings
- Dress it Up: For formal occasions, pair your crochet napkins with elegant dishware and crystal glassware for an upscale look.
- Casual Gatherings: Use the napkins for casual family dinners or picnics, allowing the crochet borders to add a fun touch.
CHECK MORE CROCHET PATTERNS