Beehive Crochet Baby Dress And Hat (FREE Pattern)
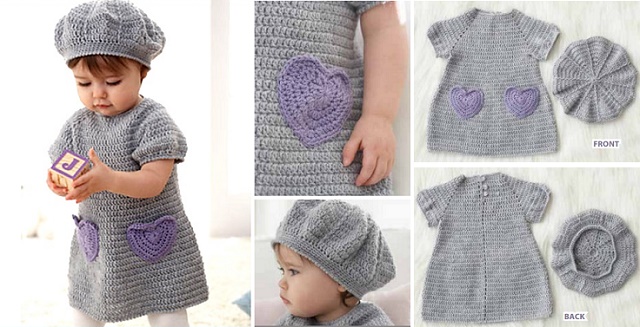
Crocheting is a delightful craft that allows you to create unique and personalized items for your loved ones.
When it comes to crocheting baby dresses and hats, the possibilities are endless. Not only are these items adorable, but they also carry a touch of handmade love that store-bought items often lack.
This guide will walk you through the process of creating beautiful crochet baby dresses and hats, from the materials you'll need to the patterns and techniques that will bring your creations to life.
Crochet Baby Dress And Hat
Wouldn’t you prefer a simple outfit for your kid that you can literally make yourself instead of the glamorous and rather kitschy clothes available in the shops?
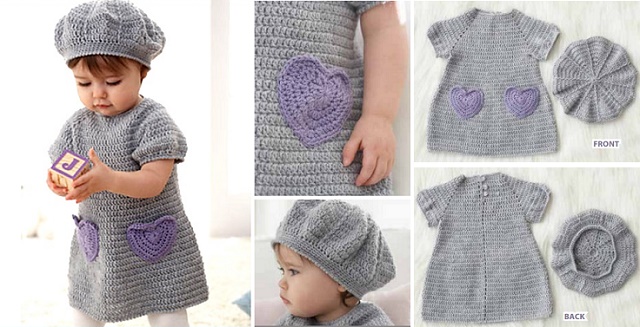
The DIY crochet project we suggest is a perfect example of why the handmade alternative is becoming so popular: it looks great! The Beehive Baby dress and hat will turn your little girl into a princess in the making. The dress is simply adorable, giving an extra amount of cuteness to your loved one!
It’s fit for a kid between 6 and 18 months. The dress is worked in one piece beg at neck edge, with its center back having an opening for buttons.
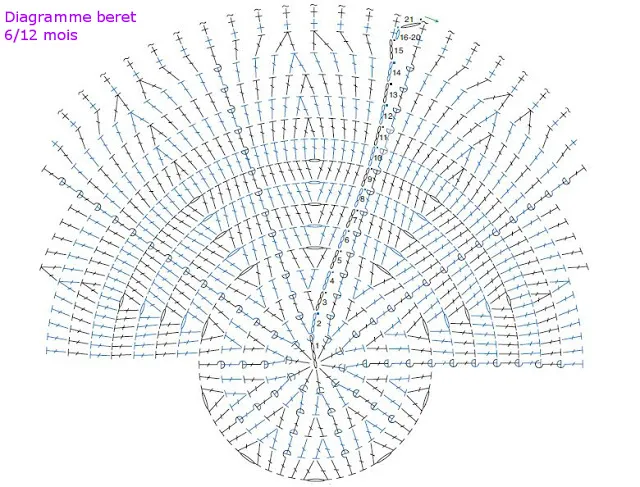
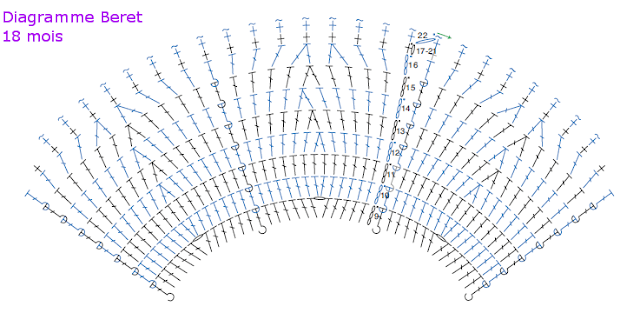
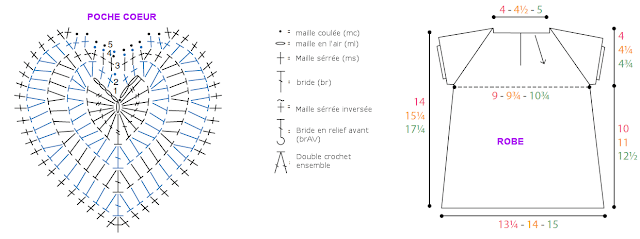
FREE PATTERN
Sample: 18 double crochets and 10 rows = 10cm
Use a smaller hook if you get a larger result and a larger hook if it is smaller.
Abbreviations:
Mc = slip stitch
Ma = stitch in the air
Sc = single crochet
Br = flange
Dbr = Double flange
DmBr = half double crochet
mV = V-shaped stitch (1 double crochet, 1 chain stitch on the same stitch)
End = work on the right side
Notes:
Explanations are given for the smallest size. If adjustments are necessary they will be in parentheses.
Each color corresponds to a size throughout the explanations.
The dress is made in one piece from the neckline. THE
center back has an opening for buttons then the rest of the dress
is worked in the round. The sleeves are also worked in the round.
Realization :
Body :
Make a chain of 48 (52 58) stitches. Do not close. To work
then on the right side, you will have to cut the thread at the end of each row.
Row 1: 1 dc in 4th dc from hook. 1 Br in the 6
(7 8) next stitches, 1 Mv in next stitch. 1 Br within 5
(5 6) next stitches. 1 Mv in the next stitch. 1 Br in the 16
(18 20) next stitches. 1 Mv in the next stitch. 1 Br within 5
(5 6) next stitches. 1 dc in the remaining 8 (9 10) stitches. We
obtains 54 (58 64) stitches. Cut the thread.
Row 2: 1 MC in the 3rd Ma from the start of the previous row. 3 Ma
(count as 1 Br). 1 dc in the next 8 (9 10) stitches. 1 Mv on
the Ma of the Mv of the previous rank. 1 dc in the 7 (7 8) stitches
following). 1 Mv on the Ma of the Mv of the previous rank. 1 Br in the 18
(20 22) next stitches. 1 Mv on the Ma of the Mv of the previous rank. 1
Dc in the next 7 (7 8) stitches. 1 Mv on the Ma of the Mv of the rank
previous. 1 dc in each remaining stitch. We get 62 (66 72)
meshes. Cut the thread.
Row 3 to 6: 1 Mc in the 3rd D from the beginning of the previous row. 3 Ma
(count as 1 Br). *1 Br in each stitch up to the 1st Br of the
Mv of the previous rank. 1 Mv in the Ma *repeat from *to* until the end of the
rank. We obtain 94 (98 104) stitches. Do not cut the film close
with a Mc on the 3rd Ma from the beginning of the row. From here the ranks
are worked in the round, closing with a Mc on the 3rd Ma from the beginning of the
rank.
Row 7: 3 Ma (counts as 1 dc) *1 dc in each stitch until
the 1st Br of the Mv of the previous rank. 1 Br-1 Ma-2 br in the Ma. 1 Br
in each stitch up to the 1st Br of the Mv of the previous row. 2 Br-1
Ma-1 Br in Ma * repeat from * to * 1 Br in each stitch
remaining. Close with a Mc on the 3rd D from the beginning of the row. We
obtains 106 (110 116) stitches.
Row 8 to 10 (11 12): like row 7. We obtain 142 (158 176) stitches. Do not cut the thread.
For the sleeves: take the thread from the other side of the ball with
which you work and cut 2 lengths of 30.5 cm. With
the place in front of you: take one of the two threads, attach it to the first
Ma which presents itself, make 4 Ma then 1 Mc on the next Ma. The base of
the 1st round is done. Do the same thing with the 2nd thread on both
My next ones. The base of the 2nd sleeve is made (4 air sts 1 sl st for
connect the sleeves)
Next row: Pick up the main thread. 3 Ma (count as one
Br) * 1 Br on each stitch of the previous row up to the 4th Ma. 1 Br on
each Ma. Continue leaving the 33 (37 42) stitches of the sleeve*.
Repeat 1 time then 1 dc on each stitch of the previous row. We obtain
80 (88 96) stitches.
Next rank: 3 Ma (counts as 1 Br). 1 Br out of the 8 (9 10)
following stitches. *2 dc on the next stitch, 1 dc on the 9 (10 11)
next stitches* repeat from * to * until the end of the row. 2 Br on the
last stitch of the row. We obtain 88 (96 104) stitches.
Next 2 (3 4) rows: 3 Ma (count as 1 Br). 1 dc on each stitch of the previous row.
Next rank: 3 Ma (counts as 1 Br). 1 Br out of the 9 (10 11)
following stitches. *2 dc on the next stitch, 1 dc on the 10 (11 12)
next stitches* repeat from * to * until the end of the row. 2 Br on
the last stitch of the row. We obtain 96 (104 112) stitches.
Next 2 (3 4) rows: 3 Ma (count as 1 Br). 1 dc on each stitch of the previous row.
Next rank: 3 Ma (counts as 1 Br). 1 Br out of the 11 (12 13)
following stitches. *2 dc on the next stitch, 1 dc on the 12 (13 14)
next stitches* repeat from * to * until the end of the row. 2 Br on
the last stitch of the row. We obtain 112 (120 128) stitches.
Next 2 (3 4) rows: 3 Ma (count as 1 Br). 1 dc on each stitch of the previous row.
Next rank: 3 Ma (counts as 1 Br). 1 Br out of the 12 (13 14)
following stitches. *2 dc on the next stitch, 1 dc on the 13 (14 15)
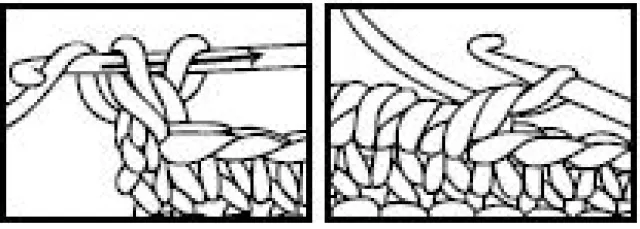
next stitches* repeat from * to *reverse double crochet
CHECK MORE CROCHET PATTERNS