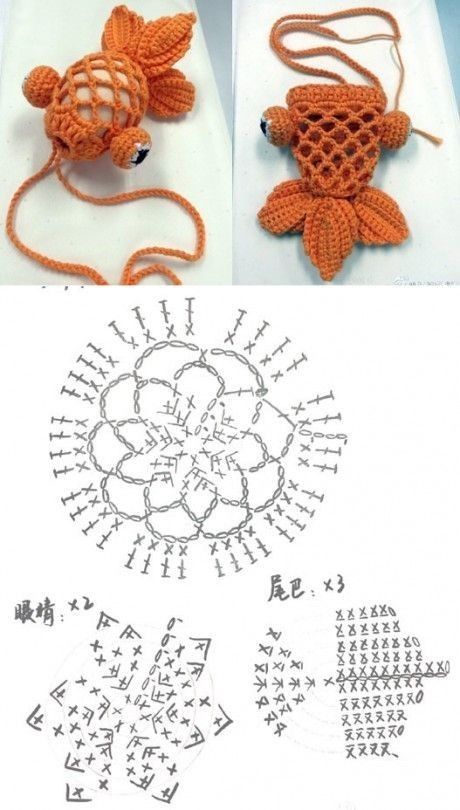
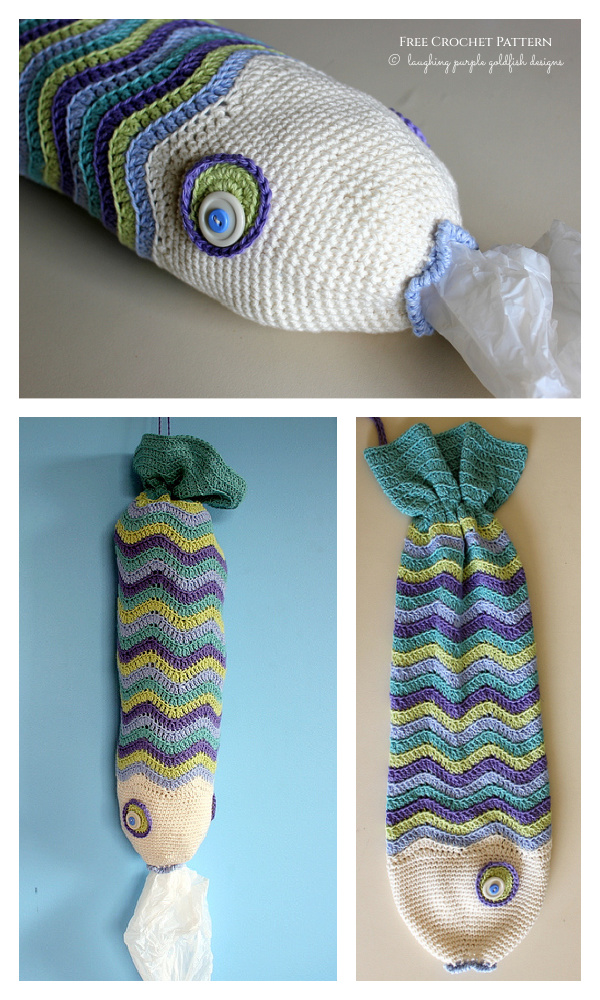
Crochet Fish Bag Free Patterns: Fun DIY Projects
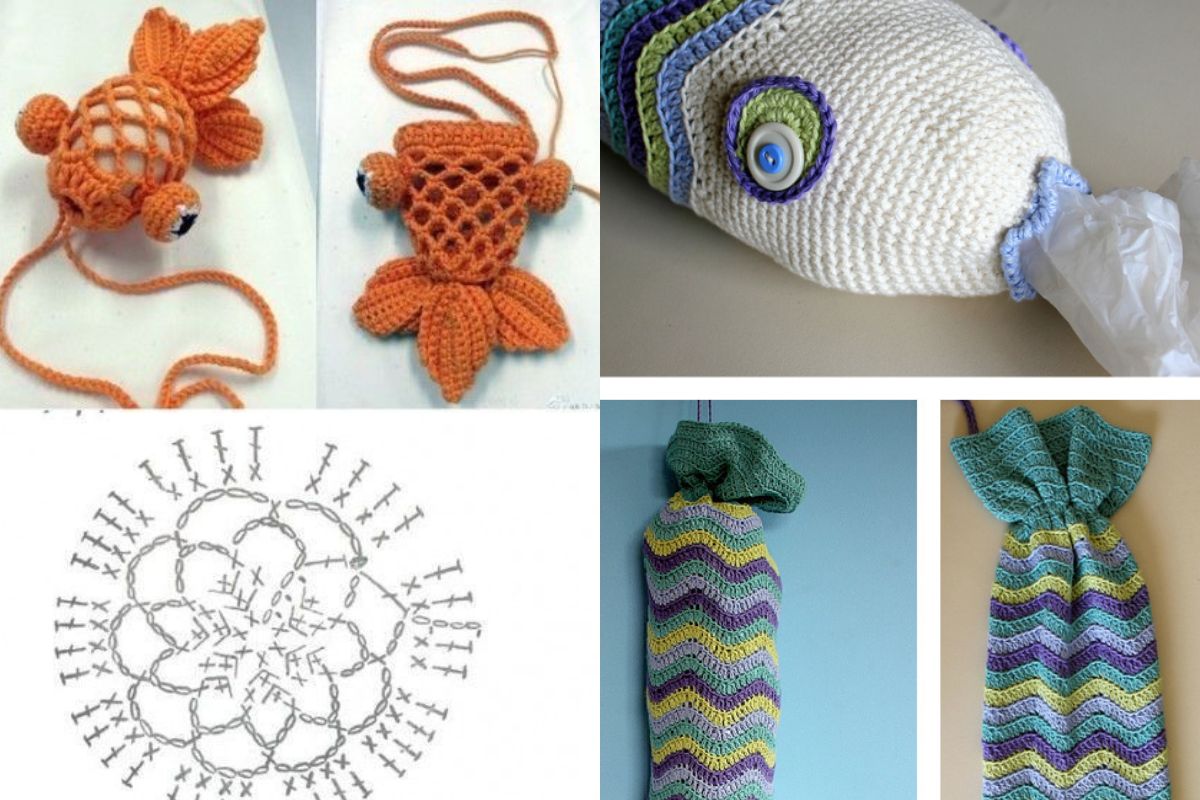
Dive into the world of crochet patterns with a splash of creativity! Fish-shaped bags are swimming their way into the hearts of crafters everywhere. These fun and functional crochet bags are perfect for beach outings, unique gifts, or simply adding a whimsical touch to your everyday accessories.
From adorable kids' fish bags to sleek shark designs, there's a pattern for every skill level.
Let's explore the sea of possibilities these handmade accessories offer. Get ready to hook into this fin-tastic trend!

Crochet Fish Bag Patterns
Fish-shaped bags are now a big hit in crochet projects. These fun DIY bags are making waves in yarn crafts. People of all skill levels are diving into this trend, making unique and fun accessories.
To make your own crochet fish bag, you’ll need the following materials:
- Yarn: Choose a worsted-weight yarn or something sturdy like cotton yarn for durability. You’ll need at least two colors: one for the body and another for the fins and tail.
- Crochet Hook: A 4mm or 5mm hook works well for most yarns, but always check the label for the recommended hook size.
- Zipper or Drawstring (optional): For closing the top of the bag.
- Tapestry Needle: For sewing the pieces together and weaving in ends.
- Scissors: To cut the yarn.
Step-by-Step Guide: How to Crochet a Fish Bag
1. Start with the Fish Body
The body of the fish bag will be worked in rounds, starting from the mouth of the fish and working toward the tail.
Foundation:
- Ch 25 (this will form the opening of the fish's mouth).
- Round 1: In the second chain from the hook, work 1 sc (single crochet) in each chain across. When you reach the end of the chain, continue working around the other side of the chain, creating an oval shape. You should have 50 sc stitches in total.
- Round 2: Continue to work sc in each stitch around, increasing by 2 stitches at both ends of the oval in each round. This helps to expand the fish's body.
- Rounds 3-12: Keep working in sc, increasing at the ends every 3 rounds to gradually build up the fish's body.
Tip: You can make the body as long or as short as you want, depending on how big you’d like your bag to be.
2. Shaping the Fish Body
Once the body is long enough, start to shape the fish’s back and belly.
- Round 13: Begin to decrease stitches by skipping every 8th stitch. This will start to taper the body toward the tail.
- Rounds 14-16: Continue decreasing every few stitches until you have a narrow opening at the tail end.
Pro Tip: You can stuff the bag slightly at this stage to give it more shape while working.
3. Create the Fish Tail
The tail fin adds character and completes the fish shape. You can make it large and flowing or short and stubby depending on your preference.
- Tail Foundation: Attach yarn to the small opening at the end of the fish body and ch 10.
- Tail Rows: Work dc (double crochet) in each chain to form the first side of the tail, then turn and work dc back down the chain. Sl st to join at the base.
- Repeat the same for the second fin, or create a larger, single fan-like fin by chaining more stitches and working in rows.
4. Crochet the Fins and Details
No fish is complete without fins and some added detailing! You’ll add these as finishing touches:
Side Fins:
- Ch 12, and sl st back into the first chain to form a loop.
- Round 1: Work sc around the chain loop, then ch 4 and sl st into the next stitch to form small fin shapes.
- Attach the fins on either side of the fish body, positioning them symmetrically.
Eyes:
- To crochet eyes, start with a magic ring, ch 1, and work 6 sc into the ring. Pull tight and sl st to join.
- Use a small piece of black yarn or a button for the center of the eye, and attach them to the head of the fish.
5. Add a Zipper or Drawstring
To make your fish bag functional, you can add a zipper or drawstring at the top of the fish’s body.
- Zipper: Sew a small zipper into the top opening of the fish bag for secure closure.
- Drawstring: If you prefer a more relaxed look, thread a chain of yarn or cord through the top stitches to create a drawstring closure.
Crochet Fish Bag Free Patterns: Beginner to Advanced
Fish-shaped bags are making a splash in the crochet world! They range from easy projects for beginners to more complex designs for experts. Let's explore some fun fish bag patterns for all skill levels.
Kids' Fish Bag Pattern
The kids' fish bag pattern is great for beginners. It uses simple stitches and bright colors. It's a fun way for new crocheters to practice basic skills and make a cute bag for kids.
Mystery Fish Pouch Design
Try the mystery fish pouch for a challenge. It's perfect for intermediate crocheters who want to learn new stitches and shapes. The result is a magical fish bag that keeps its secrets.
Drawstring Fish Bag Tutorial
The drawstring fish bag combines fun with function. It's a great choice for those who want to try something new. The drawstring adds a useful touch to the playful fish design.
Advanced crocheters will love the shark bag pattern. It has intricate details and complex shapes. The finished bag is a stunning fish design that showcases your skills.
Crochet fish bag free patterns open up a world of creativity for DIY fans. These projects mix fun and function, appealing to all skill levels. They range from easy designs for beginners to complex ones for experts.
When starting your fish bag project, remember to customize it. Try different colors and add special touches to make it unique. These bags are not only fun to make but also useful. They're great for beach trips, storing things, or as unique gifts.
The crochet community loves to share and inspire. After finishing your fish bag, show it off. Post pictures online, exchange tips with others, or even sell your work. With these free patterns, you're not just making something. You're joining a community of creativity and skill.
CHECK MORE CROCHET PATTERNS