Crochet Hexagon Slipper Boots - Cozy and Stylish DIY Pattern
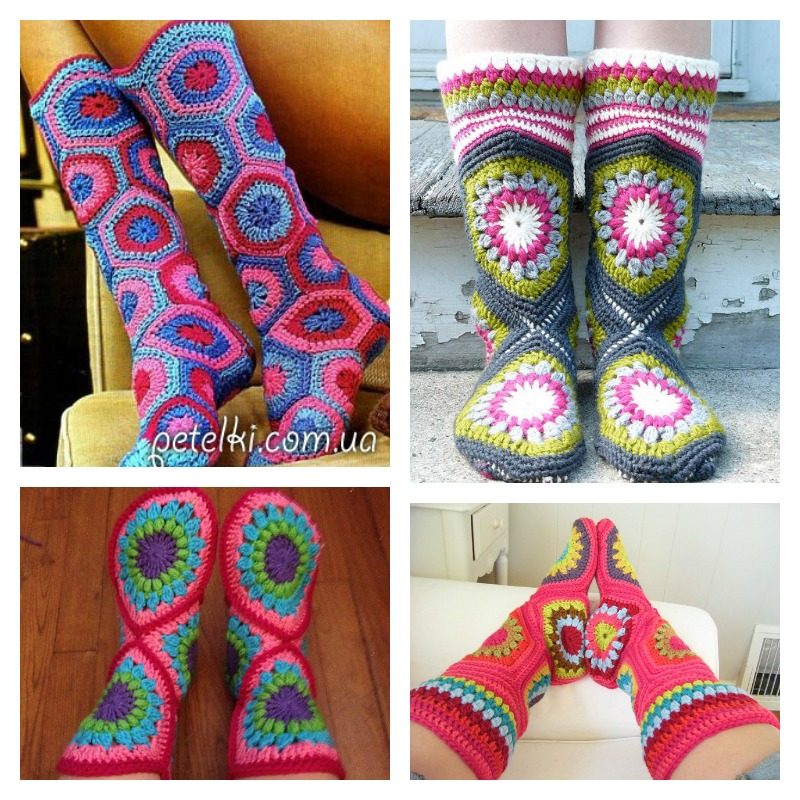
These hexagon boot slippers are made using Hexagon Granny Squares.
They are not only cute and extra warm, but also much more comfortable than the usual store bought slippers.
Beautiful way the sole of this slipper is crocheted. Though these are a little hard for beginners, it’s totally worth to try.
Crochet Hexagon Slipper Boots
Stay cozy and stylish with Crochet Hexagon Slipper Boots!
These delightful boots are perfect for keeping your feet warm during the colder months while adding a touch of handmade charm to your wardrobe. With their unique hexagon pattern, these slipper boots are as fun to make as they are to wear.
Let’s explore how you can create your own pair with this comprehensive guide.
Learn how to crochet cozy and stylish hexagon slipper boots with our detailed guide.

Perfect for keeping warm and as a thoughtful gift. Step-by-step instructions for all skill levels!
Via Pinterest
Step-by-Step Guide
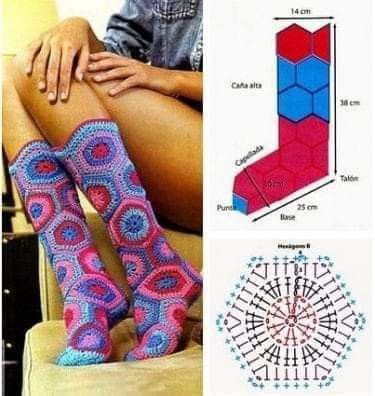
1. Create the Hexagons
Each slipper boot is made up of several hexagons sewn together. Here’s how to crochet a basic hexagon:
Hexagon Pattern
Round 1: Start with a magic ring. Chain (ch) 3 (counts as first double crochet), 11 double crochet (dc) into the ring. Join with a slip stitch to the top of the beginning ch-3.

Round 2: Chain 3 (counts as first dc), 1 dc in the same stitch, *chain 2, 2 dc in the next stitch*, repeat from * to * around, join with a slip stitch to the top of the beginning ch-3.

Round 3: Slip stitch into the next dc and into the chain-2 space, chain 3 (counts as first dc), 2 dc in the same space, *3 dc in the next chain-2 space*, repeat from * to * around, join with a slip stitch to the top of the beginning ch-3.
2. Assemble the Hexagons
Once you have crocheted the necessary number of hexagons, it’s time to join them.
Step 1: Lay out the hexagons in a pattern that forms the shape of the boot.

Step 2: Using the tapestry needle, sew the hexagons together with a whip stitch or slip stitch them together with your crochet hook.
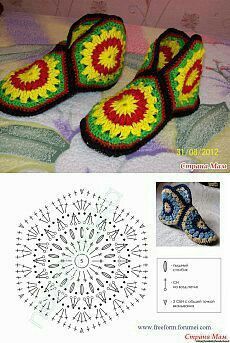
3. Create the Sole
Crochet the sole separately and then attach it to the assembled hexagon upper.
Sole Pattern
Row 1: Chain (ch) 20 (or the length needed to fit the bottom of your foot).

Row 2: Single crochet (sc) in the second chain from the hook and in each chain across. Turn.

Rows 3-8: Chain 1, sc in each stitch across. Turn.

Finish off and weave in ends.
4. Attach the Sole
Sew the sole to the bottom of the assembled hexagons to complete the boot.
Step 1: Align the sole with the bottom of the hexagon assembly.

Step 2: Using the tapestry needle, sew the sole to the hexagons with a whip stitch.
Pro Tip: Add a non-slip sole for added safety and durability.
Ways to Customize Your Hexagon Slipper Boots
The beauty of crochet is that you can tailor your projects to your own personal style! Here are a few ways to make your hexagon slipper boots unique:
1. Color Play
- Create color-blocked slippers by using different shades for each hexagon.
- Use variegated yarn to add a pop of multicolored flair without switching between skeins.
2. Add a Lining
- Line the inside of your slippers with fleece fabric to make them extra warm and comfy for winter.
3. Add a Sole
- For extra durability and grip, sew leather or felt to the bottom of the slippers. This is particularly useful if you plan on wearing your slippers around the house.
4. Personalized Embellishments
Add a crocheted flower, pom-poms, or even small tassels to the ankle area for a fun and decorative finish.
Learn how to crochet cozy hexagon slipper boots with this easy step-by-step guide. Perfect for beginners and customizable for any style! Keep your feet warm in style!
CHECK MORE CROCHET PATTERNS