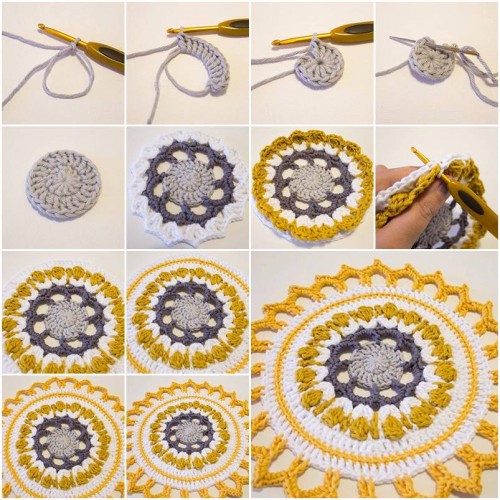
Crochet Mandala Flower (FREE PATTERN)

Crochet mandalas are magical. Beautiful, easy to make and very practical, can be used in so many ways : rugs, pillow cushions, coasters, pot holders, blankets, wall decorations… you name it!
Here are 1 of the most beautiful free crochet mandala patterns I’ve found and loved and though you may like them too.
Check them on the next pages.
How To Crochet A Beautiful And Colorful Mandala
Crocheting a mandala flower is not only a creative process but also a meditative one, as it involves working in rounds with various colors and stitches.
Mandalas symbolize harmony and balance, and when crafted into a crochet piece, they bring that sense of peace into your life and space.
Whether you use it as a decorative centerpiece, a wall hanging, or part of a larger project, a crochet mandala flower is a stunning piece that will showcase your crochet skills and artistic flair.

Have a look and grab your favorite free crochet mandala patterns.

Materials Needed for a Crochet Mandala Flower
Before you start crocheting your mandala flower, gather the following materials:
- Yarn: Select multiple colors of yarn in a lightweight or medium-weight variety, like cotton or acrylic. Choose at least 3-5 contrasting colors to create the vibrant look typically associated with mandalas.
- Crochet Hook: Use a 3.5mm to 4.5mm crochet hook, depending on the yarn weight.
- Yarn Needle: For weaving in the ends once the mandala is complete.
- Scissors: To trim any excess yarn after finishing your project.
- Stitch Markers (optional): To keep track of rounds or complex stitch changes.
Step-by-Step Guide: How to Crochet a Mandala Flower
1. Start with a Magic Ring
- Magic Ring: Begin your mandala flower with a magic ring (or magic circle). This creates a tight center, which is essential for a clean, polished mandala design. Crochet 6 single crochets (SC) into the ring and pull tight to close.
- Slip Stitch to Close Round: After completing the first round, close the round with a slip stitch into the first single crochet.
"Using a magic ring instead of chaining makes for a tighter, neater center, which is key to creating the symmetrical look of a mandala."
2. Increase in Rounds
To give your mandala flower its characteristic circular shape, you’ll need to gradually increase the stitch count in each round.
- Second Round: For the second round, crochet 2 double crochets (DC) into each stitch from the previous round, giving you a total of 12 stitches.
- Third Round: In the third round, crochet 1 DC in the first stitch, then 2 DC in the next stitch, and repeat around. This increases the stitch count to 18 stitches.
"The key to a perfect mandala is even stitch increases in each round to maintain the circular shape without curling or stretching."
3. Introduce Color Changes
One of the most visually stunning aspects of mandalas is their vibrant color changes. After completing a few rounds, change colors by fastening off the current yarn and attaching a new color.
- Changing Colors: After completing a round, slip stitch into the first stitch, fasten off the yarn, and join a new color with a slip stitch into any stitch from the previous round.
- Work in New Color: Continue crocheting in the new color, working in the pattern you’ve chosen, whether it’s single crochet, double crochet, or other decorative stitches like puff stitches or picot stitches.
"Don’t be afraid to experiment with bold color combinations! The more vibrant, the more captivating your mandala will be."
4. Add Texture with Decorative Stitches
To give your mandala flower depth and interest, try incorporating textured stitches such as:
- Popcorn Stitches: Work multiple double crochets into one stitch, remove the hook, and insert it into the first stitch to create a "popcorn" effect.
- Puff Stitches: Yarn over multiple times in the same stitch, pull through all loops, and secure to create a puffed texture.
- Shell Stitches: Create a fan-like design by working multiple stitches (like 5 DC) into a single stitch, then skipping a few stitches before repeating.
"Textured stitches give your mandala a three-dimensional look, making it more eye-catching and tactile."
5. Work in the Round Until Desired Size
Continue working in rounds, increasing the stitch count as needed, and switching colors every few rounds for variety. You can stop at any size, depending on how large or small you want your mandala flower to be.
- Small Mandala: Stop after 5-6 rounds for a small coaster-sized mandala.
- Large Mandala: Keep adding rounds until you reach 10-12 rounds for a larger decorative piece.
6. Finish and Block Your Mandala Flower
- Fasten Off: Once you’ve reached your desired size, fasten off the yarn and weave in any loose ends with a yarn needle.
- Block the Mandala: Lightly block your mandala by dampening it and pinning it into shape on a soft surface (like foam or a towel). This ensures that your mandala lays flat and maintains its beautiful circular shape.
CHECK MORE CROCHET PATTERNS