Crochet Queen Butterfly: A Majestic Crochet Project for All Skill Levels
The Crochet Queen Butterfly is a stunning and detailed crochet project that captures the beauty and elegance of one of nature's most regal creatures.
Whether you want to use it as a decorative piece for your home, as an applique for clothing or accessories, or even as part of a larger art project, the crochet queen butterfly is versatile and delightful to create.
With its delicate wings and vibrant colors, this butterfly project will help you hone your crochet skills while adding a touch of elegance to your crafting portfolio.
In this article, we’ll provide you with a step-by-step guide to crocheting a queen butterfly, tips for customizing it with different colors and patterns, and ideas for how to use it creatively. Ready to create your own majestic butterfly? Let’s dive in!
Crochet Queen Butterfly
If you’ve been looking for an introductory project to get used to the art of crochet, we think we’ve found the perfect pattern for you!
Not only are these crochet butterflies simple stunning to look at, they’re also quite unbelievably easy to make.
A perfect introduction to the most important crochet stitches and guaranteed to have you finding your feet in no time, you’ll have as much fun making them as you will finding new homes for them!
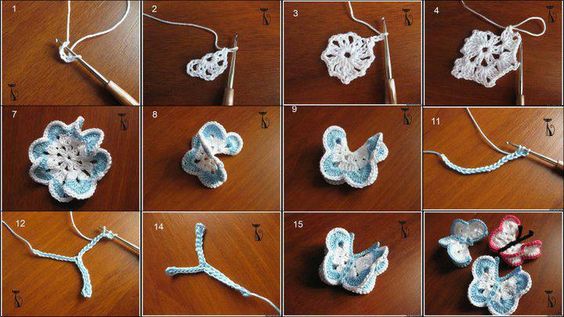
Along with an incredibly easy-to-follow video tutorial and picture guide, you’ll also find the written pattern via the link below to help you get to grips with understanding classic crochet.
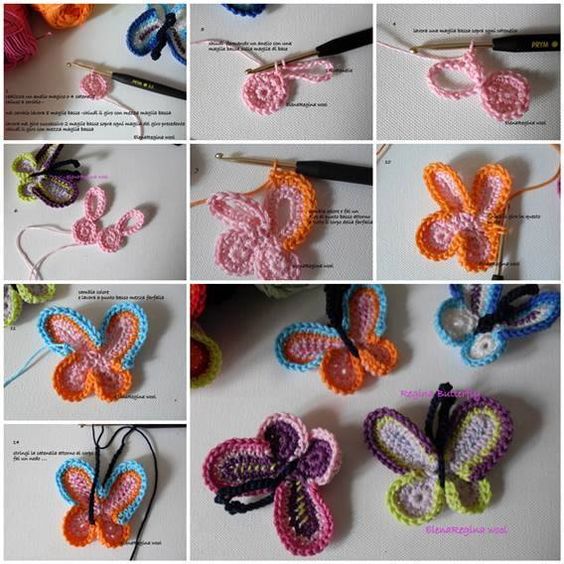
Easiest Crochet Butterfly Tutorial

There’s really no better starting point you could wish for – master the basics with these and the sky’s the limit for your newly-discovered skills!
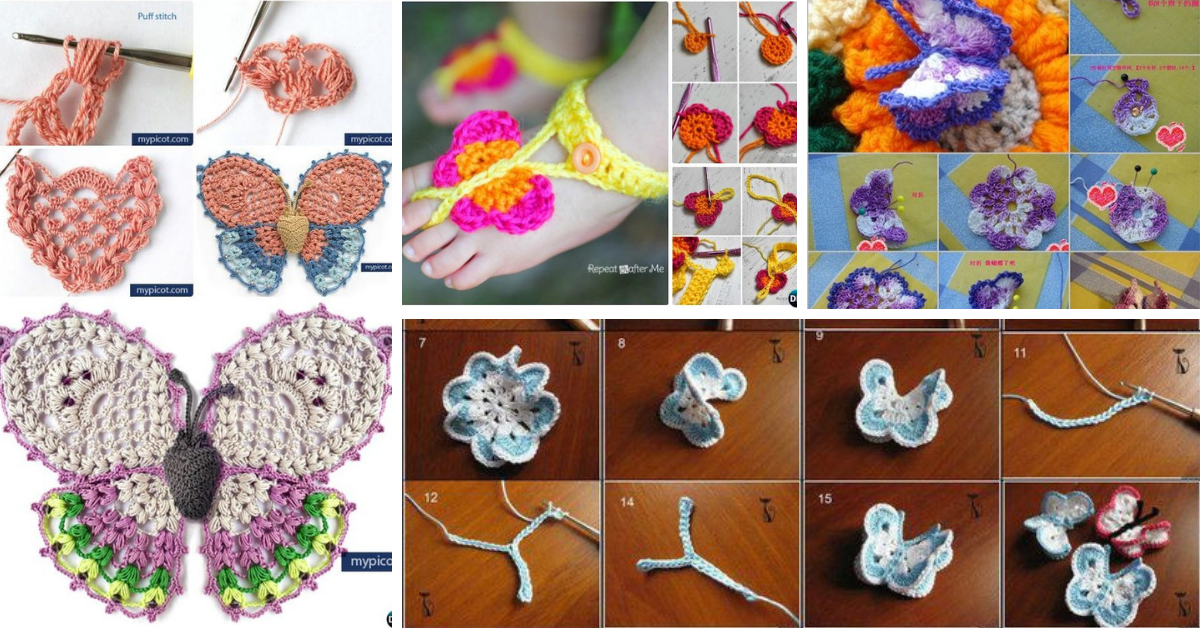
Crochet Butterfly Tutorial
From: madona-mia-trico-croche.blogspot.com
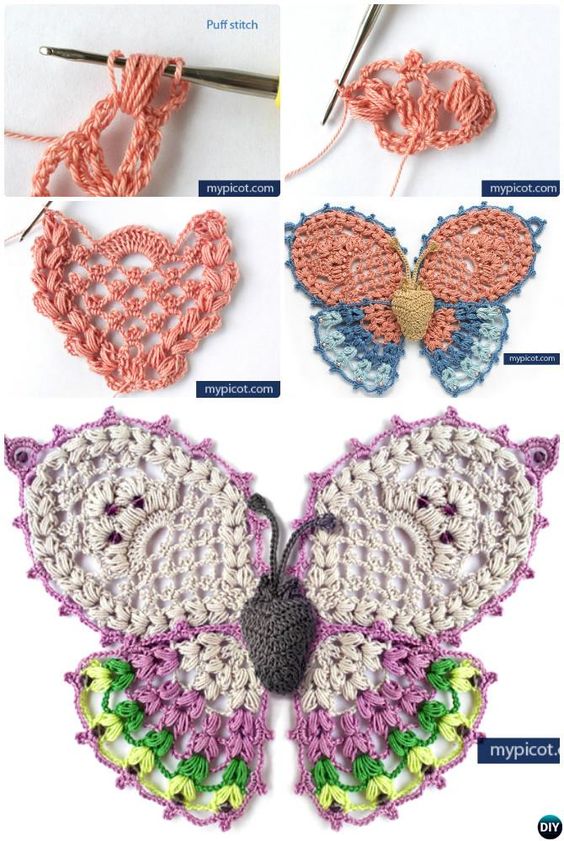
Soure: mypicot.com

Before starting your crochet queen butterfly, gather the following materials:
- Yarn: Use lightweight or medium-weight yarn in at least two contrasting colors (one for the body and one for the wings). You can choose bright, vibrant colors or more natural tones to mimic a real butterfly.
- Crochet Hook: A 2.5mm to 3.5mm hook is ideal for creating detailed stitches with a tight tension.
- Yarn Needle: For weaving in ends and sewing pieces together.
- Scissors: To trim the yarn once the project is complete.
- Beads or Embellishments (Optional): For adding extra sparkle to the wings or body of the butterfly.
Step-by-Step Guide
1. Create the Butterfly Body
- Chain for the Body: Begin by making a chain of 10 stitches. This will serve as the base for the butterfly’s body.
- Single Crochet Around: Work single crochet (SC) into each stitch across the chain. When you reach the end, chain 1 and turn to crochet back down the other side of the chain. Continue crocheting in rounds to create a long, slender body for the butterfly.
- Increase at the Head: Once the body is the desired length, you can create a slightly rounded head by increasing stitches at one end. Work 2 single crochets in each stitch around the head area for a few rounds until it is rounded.
- Fasten Off: Once the body and head are complete, fasten off the yarn and weave in the ends.
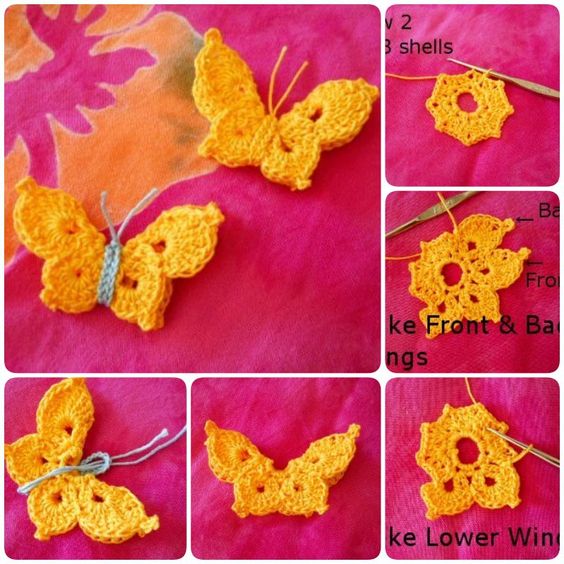
2. Crochet the Upper Wings
- Create a Foundation Chain: For each upper wing, start by chaining 15 stitches. This will serve as the base of the wing.
- Work Double Crochets (DC): In the second chain from the hook, work double crochets (DC) across the chain. At the end of the row, chain 3 and turn.
- Increase for Shape: As you continue crocheting, increase stitches at both ends of each row to create the curved, wide shape of the upper wings. Work 2 double crochets in the first and last stitch of each row.
- Create a Lacy Pattern: To give the wings a lacy, net-like appearance, alternate between working solid rows of double crochet and rows of chain spaces (chain 2, skip 2 stitches, DC in the next stitch). This will add texture and elegance to the wings.
- Fasten Off: Once the upper wing is the desired size, fasten off the yarn and weave in the ends. Repeat the process to create the second upper wing.
3. Crochet the Lower Wings
- Chain for Lower Wings: Chain 10 stitches for the base of the lower wings.
- Work in Half-Double Crochets (HDC): Work half-double crochets (HDC) across the chain. At the end of each row, chain 2 and turn.
- Shape the Wings: To shape the lower wings, increase stitches only at one end of the row to create a tapered, curved effect. Work 2 HDC in the last stitch of each row.
- Add Texture: Like the upper wings, you can add texture by alternating solid HDC rows with chain spaces or shell stitches to mimic the patterns seen on real butterfly wings.
- Fasten Off: After creating two matching lower wings, fasten off and weave in the ends.
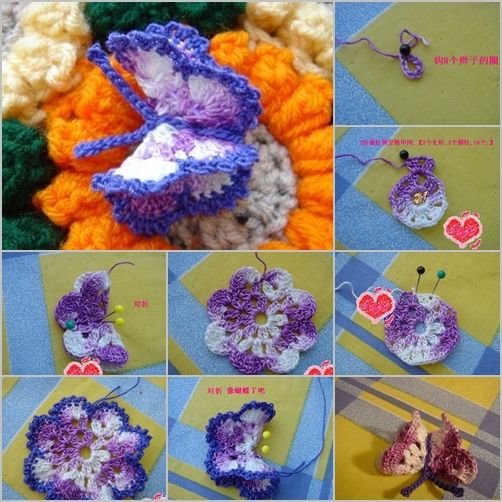
4. Assemble the Butterfly
- Attach the Wings to the Body: Using a yarn needle, sew the upper and lower wings to the sides of the butterfly’s body. Ensure that they are evenly placed on each side.
- Shape the Wings: After attaching, shape the wings by gently pulling and adjusting the stitches. If needed, block the wings to help them hold their shape.
5. Add Antennae and Embellishments
- Create Antennae: For the antennae, chain 10-12 stitches with a fine yarn or embroidery thread. Sew the antennae onto the top of the butterfly’s head.
- Optional Embellishments: Add beads, sequins, or glittery yarn to the wings for a sparkling, magical effect. You can also use contrasting yarn to embroider patterns onto the wings for added detail.
Enjoy!
CHECK MORE CROCHET PATTERNS