How to Crochet a Beautiful Swan: Step-by-Step Guide and Creative Tips

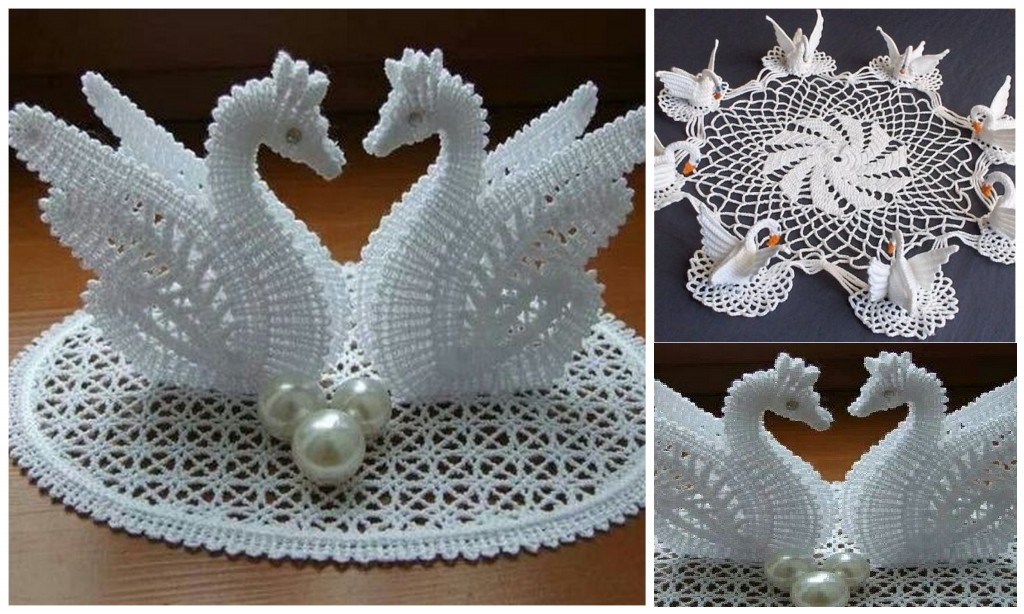
Today we want to talk about this beautiful crochet swans that are presented on the photos and of course you are going to find some instructions of this project (the pattern) to crochet swans like this on your own.
The pattern is very easy, the swans can be used for decoration of your home and not only, it depends only on your imagination but trust me if you follow the steps from the pattern and crochet swans you will not be disappointed in the end.
I have seen project that was like this one in my friends home and to be honest I got a little jelous of her and I am surely going to crochet at least on swan for my home.
How to Crochet Swan
So enjoy the article and share it with your friends. Good luck !

Materials Needed for Crochet Swan
Before starting, gather these materials to make the process smoother:
- Yarn: White yarn works best for a classic swan, but you can choose any color for a unique look. Use a DK or worsted weight yarn for medium-sized swans.
- Crochet Hook: A hook size between 3.5mm and 4.5mm is ideal, depending on the yarn weight.
- Polyfill Stuffing: To give the swan a soft, rounded shape.
- Tapestry Needle: For sewing parts together and weaving in ends.
- Stitch Markers: Useful for tracking rows, especially in rounds.
- Scissors: Essential for trimming yarn.
- Black and Orange Embroidery Thread or Felt: For adding the beak and eyes.

Tip: Choose a soft, smooth yarn to give the swan a clean, polished appearance.
Step-by-Step Guide to Crocheting a Swan
1. Start with the Swan’s Body
The swan’s body is made using simple rounds, creating an oval shape.
- Magic Ring: Start with a magic ring, chain 1.
- Round 1: Work 6 single crochet (sc) stitches into the ring, then pull it tight to close.
- Increase Rounds: For the next few rounds, increase the stitch count by working 2 sc in each stitch until you reach 12-14 stitches.
- Form the Oval Shape: Continue working rounds with fewer increases, focusing on lengthening the oval to shape the swan’s body.
- Stuff the Body: As you progress, begin to stuff the body with polyfill. Keep it firmly packed for a well-rounded shape.
Body Tip: Ensure you keep the stuffing even to prevent lumps that can distort the swan’s shape.
2. Create the Neck and Head
The neck and head are worked in a long chain that gradually narrows to form a graceful curve.
- Chain Foundation: Chain 15-20 for a long neck, and then turn.
- Row 1: Starting in the second chain from the hook, single crochet (sc) across. Chain 1, turn.
- Continue Rows: Work single crochet rows, decreasing gradually near the top of the neck to create a slight taper for the head.
- Shape the Head: Form a small oval for the head by increasing in one round, then taper it off by decreasing until you have a rounded top.
- Stuff the Neck: Lightly stuff the neck with polyfill to make it bendable, and attach it to the body securely.
Shaping Tip: Slightly bend the neck as you stuff it to create a natural, elegant curve.
3. Make the Wings
The swan’s wings add texture and a touch of realism. Crochet each wing separately and sew them onto the body.
- Wing Base: Chain 10 for the wing base, then single crochet in each stitch.
- Increase Rows: Work double crochet (dc) stitches for three to four rows, gradually increasing in every other stitch to create a fan shape.
- Add Feathers: For a feathered effect, switch to shell stitches on the last row.
- Make the Second Wing: Repeat the process to make a second wing.
Wing Placement: Position the wings on each side of the body and sew them at a slight angle to give a natural appearance.
4. Finish with the Beak and Eyes
Add the finishing touches by creating a small beak and eyes.
- Beak: Using orange embroidery thread or felt, stitch or glue a small triangle shape onto the swan’s head.
- Eyes: Use black thread or felt dots to create small eyes on either side of the head.
Customization Ideas for Your Crochet Swan
Make your swan unique with these creative ideas:
1. Use Different Colors
Classic white is elegant, but don’t be afraid to experiment with color!
- Black Swan: Create a black swan for a dramatic, sophisticated look.
- Pastel Colors: Soft pinks, blues, or lavender yarn add a whimsical touch.
- Multicolor: Use variegated yarn to add subtle color variations throughout the swan.
2. Add Beaded Details
Give your swan some sparkle with beads.
- Embellished Wings: Sew small beads or pearls onto the wings for a glamorous effect.
- Beaded Eyes: Use tiny black beads for eyes to give a lifelike shine.
Beading Tip: Make sure beads are secure if the swan is meant for a child’s room or gift.
3. Create a Family of Swans
Vary the sizes to make a family of swans.
- Small and Large Sizes: Use finer yarn and a smaller hook for a baby swan.
- Mini Swans: Make mini versions as cute keychain accessories or ornaments.
- Color Variation: Have fun by creating each swan in different shades.
4. Add Feathers or Fur Yarn
Enhance the texture of the swan with different yarn types.
- Feathered Wings: Use fluffy or eyelash yarn for the wings to create a feathery look.
- Furry Neck: Add a soft, textured yarn along the neck to give a downy, realistic touch.
Textured Tip: Experiment with different yarns and fibers to find the perfect texture for your swan’s wings.
CHECK MORE CROCHET PATTERNS