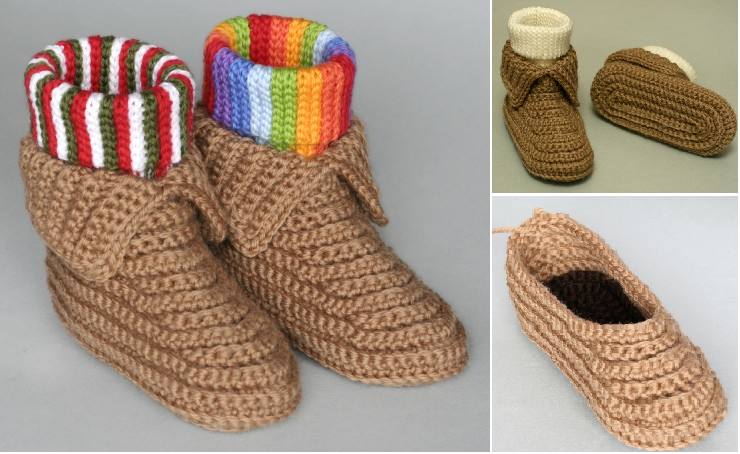
Crocheted Soccasins Pattern + Video

In Winter we want to prepare and we need warm clothing, shoes and accessories for cold and frosty weather. We searching lot in internet for designs and patterns.
Today we want to teach you how to crochet beautiful, cozy, and warm crochet boots to defend you from cold in winter.
We have searched for you pattern and video to crochet easier and be happy with your results. These boots are very useful and it will be great gift for your close people.
Crocheted Soccasins Pattern
Crocheted moccasins are a charming and cozy footwear option that adds warmth and a handmade touch to any wardrobe. Ideal for lounging around the house or as a unique gift, crocheted moccasins bring a sense of style and comfort to those chilly days.
This article provides a comprehensive guide on creating your own moccasins, including a detailed pattern, tips for customization, and helpful insights on how to achieve the perfect fit.

You also can change colors and remake design of course. Enjoy and prepare for winter with us.
Materials Needed for Crocheted Moccasins
Before you begin, gather the following materials:
- Yarn: Choose a durable yarn, such as wool-blend or acrylic, that’s soft yet strong. Worsted weight (Category 4) is ideal for a comfortable fit.
- Crochet Hook: Use the recommended hook size on your yarn label, typically around 5mm-6mm for worsted weight yarn.
- Stitch Markers: Useful for keeping track of rounds and stitch counts.
- Tapestry Needle: For weaving in ends and sewing seams.
- Scissors: For trimming yarn.
- Non-slip sole (optional): Adding a slip-resistant sole will make the moccasins safer for walking on hardwood or tile floors.
Step-by-Step Crocheted Moccasins Pattern
This pattern guides you through creating a pair of cozy crocheted moccasins. The pattern is suitable for sizes S (US Women’s 6-7), M (8-9), and L (10-11). Adjust the length by adding or reducing rows as needed.
1. Create the Sole
The sole serves as the foundation of your moccasin. This part should be dense to provide a sturdy base.
Instructions for Sole:
- Chain 20 (S), 22 (M), or 24 (L) stitches, depending on your size.
- Round 1: Single crochet (sc) in the second chain from the hook and in each chain across. In the last chain, work 3 sc to turn the corner. Continue single crocheting down the other side of the foundation chain, ending with 2 sc in the last stitch. Slip stitch to join. (40, 44, or 48 stitches)
- Round 2: Chain 1. Work 2 sc in the first stitch, sc in the next. Repeat around, working 3 sc in each corner stitch to maintain the oval shape. Slip stitch to join.
- Round 3-4: Repeat Round 2, increasing evenly around to form an oval that matches the length of your foot. Slip stitch to join, fasten off, and weave in ends.
2. Crochet the Moccasin Body
Now that you have a sturdy sole, you can start crocheting the body of the moccasin.
Instructions for the Body:
- Attach Yarn to the Sole: Reattach your yarn to any point along the sole.
- Row 1: Chain 1 and single crochet (sc) evenly around the entire sole, joining with a slip stitch. This creates a solid base to build the body.
- Rows 2-5: Work in sc around, joining each row with a slip stitch. This will raise the walls of the moccasin, creating a slipper-like shape.
- Row 6 (Toe Shaping): Begin decreasing for the toe. Start with sc in the first stitch, sc2tog (single crochet two stitches together), and repeat around the toe area, leaving the sides and back untouched. Slip stitch to join.
Tip: For a roomier toe area, continue without decreases for an additional row before starting the toe shaping.
3. Adding the Moccasin Top
The top part of the moccasin adds structure and warmth around the foot.
Instructions for the Top:
- Mark Center Front: Identify the center front of the moccasin, using stitch markers if necessary.
- Rows 1-3: Starting from the center front, sc across the top of the moccasin, ending at the opposite side of the front. Turn each row to create a flap over the foot.
- Row 4: Work sc2tog at each end to taper the flap for a snug fit.
- Finishing Row: Slip stitch around the entire moccasin opening for a clean edge. This step also reinforces the opening, making it more durable.
CHECK MORE CROCHET PATTERNS