Easy-to-Make Crochet Queen Butterfly (With Video Tutorial)

A perfect introduction to the most important crochet stitches and guaranteed to have you finding your feet in no time, you’ll have as much fun making them as you will finding new homes for them!
Also: 3D Butterfly Stitch in Crochet: Easy Guide
Along with an incredibly easy-to-follow video tutorial and picture guide, you’ll also find the written pattern via the link below to help you get to grips with understanding classic crochet.
There’s really no better starting point you could wish for – master the basics with these and the sky’s the limit for your newly-discovered skills!
Customization Ideas for Your Crochet Queen Butterfly
Want to make your crochet butterfly truly one-of-a-kind? Here are some creative ways to customize it:
- Experiment with Colors: Use gradient or variegated yarn to add depth to the wings.
- Add Beads or Embroidery: Sew small beads onto the wings to mimic the detailed spots of real butterflies.
- Use Metallic Thread: Incorporate metallic yarn or thread for a shimmering effect, making your butterfly look like it’s glistening in the sun.
- Layer Multiple Butterflies: Create a wall-hanging or mobile by attaching several butterflies to string.
VIDEO TUTORIAL

If it’s your very first time with a crochet needle, we highly recommend arming yourself with a fair bit of yarn in several colors and practicing on a bunch of these babies – they’re perfect for mastering the basics!
It won’t be long before you’re ready to spread your wings and fly into more complex projects – the fact that you’ll have made dozens of adorable crochet butterflies in the process is also a bonus!
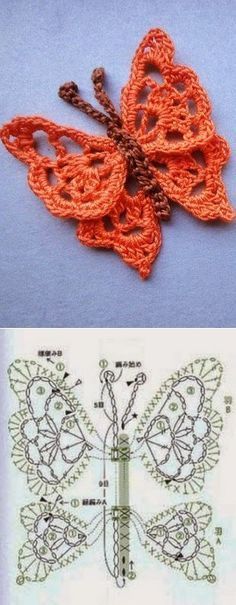
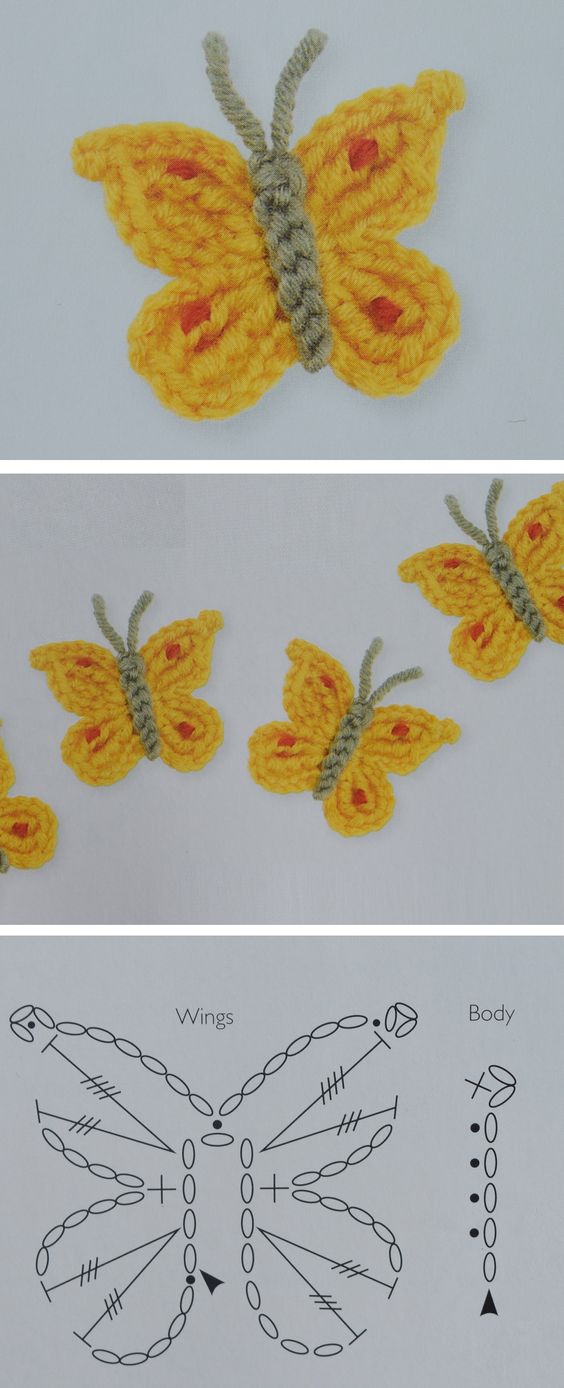
Crochet Butterfly Tutorial
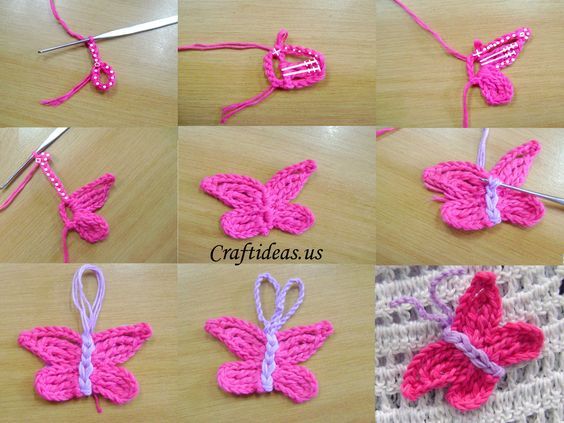
Via: crafideas.us
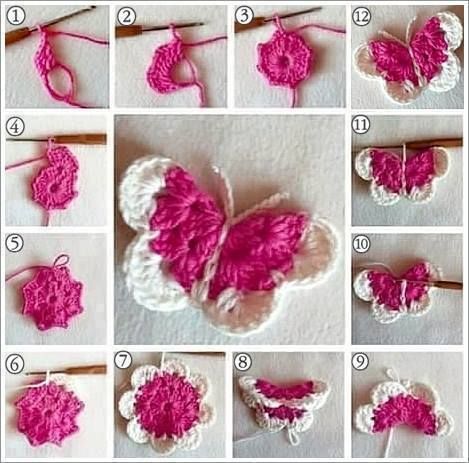
Via: Cleide de Paula

Via: mypicot
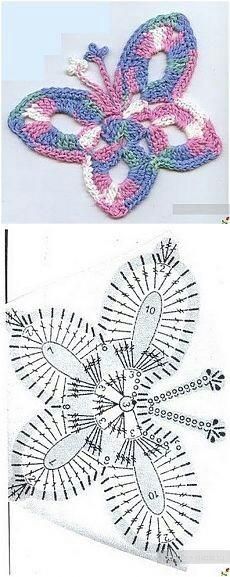
Via: www.crochetkingdom.com/free-crochet-butterfly-patterns/
Materials Needed
Before you start, gather the following materials:
- Yarn: Choose a medium-weight yarn in your favorite colors (e.g., cotton or acrylic).
- Crochet hook: A size appropriate for your yarn (usually size G/6 or H/8).
- Scissors
- Tapestry needle: For weaving in ends.
Optional:
- Beads or sequins for added embellishment
- Wire (for shaping the wings)
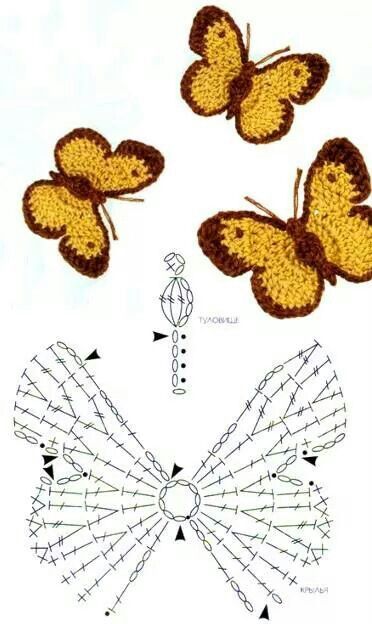
Step-by-Step Guide to Crocheting a Queen Butterfly
1. Start with the Body
Begin by crocheting the body of the butterfly:
- Foundation Chain: Chain 6.
- Row 1: In the 2nd chain from the hook, make 1 single crochet (SC), then 1 SC in each of the next 4 chains (5 SC total).
- Row 2: Chain 1, turn, and make 2 SC in the first stitch, then 1 SC in each of the next 3 stitches (7 SC total).
2. Create the Wings
Now, let’s make the wings:
- Right Wing:
- Chain 3, and in the first stitch, make 2 double crochets (DC), 2 half double crochets (HDC), and 1 SC.
- Chain 3, then slip stitch back to the same stitch to form a loop.
- Slip stitch back to the body.
- Left Wing:
- Repeat the same steps as the right wing but work on the opposite side of the body.
3. Add Details
Embellish your butterfly to give it personality:
- Add Texture: Use different stitches or yarns for the wings to create visual interest.
- Embellishments: Sew on beads or sequins to mimic butterfly patterns.
4. Finishing Touches
To complete your butterfly:
- Weave in Ends: Use your tapestry needle to weave in any loose ends for a neat finish.
- Shape the Wings: If using wire, gently shape the wings for added dimension.
“Every stitch brings your butterfly to life—let your creativity soar!”
Creative Uses for Your Crochet Butterfly
Once you've completed your butterfly, consider these fun uses:
- Home Decor: Hang them on walls or windows to add a pop of color.
- Gifts: Use them as charming embellishments on gift wrapping or cards.
- Accessories: Attach a butterfly to hair clips, brooches, or bags for a unique accessory.
- Mobile: Create a mobile for a nursery or playroom using multiple butterflies.
Crocheting a Queen Butterfly is a delightful project that brings joy and creativity to your crafting. With this guide, you'll be ready to create beautiful butterflies that can enhance any space. Happy crocheting!
CHECK MORE CROCHET PATTERNS