Crochet a Sakura Flower - Simple DIY Guide
Are you looking to add a touch of spring to your crafting projects? Crocheting sakura flowers is a delightful way to bring the beauty of cherry blossoms into your handmade creations. In this step-by-step crochet sakura flower guide, we will show you how to create your own sakura flowers with ease.
Whether you're a seasoned crocheter or a beginner, our easy crochet sakura flower instructions will provide you with all the guidance you need. With this DIY sakura flower crochet tutorial, you'll be able to craft these delicate blossoms in no time.
Using a combination of pink, green, and dark pink yarn, you'll create intricate petals that capture the essence of Japanese cherry blossoms. Follow our detailed sakura flower crochet pattern and watch as your handmade sakura flowers come to life.
Crochet a Sakura Flower
Not only are these crocheted sakura flowers perfect for embellishing your accessories and decorations, but they also make heartfelt gifts for your loved ones. Their versatility allows you to use them in various ways, from attaching them to headbands and scarves to sewing them onto blankets and pillows.
Get ready to immerse yourself in the art of crocheting cherry blossom flowers with our Japanese sakura crochet tutorial. Let your creativity bloom as you dive into this delightful craft.

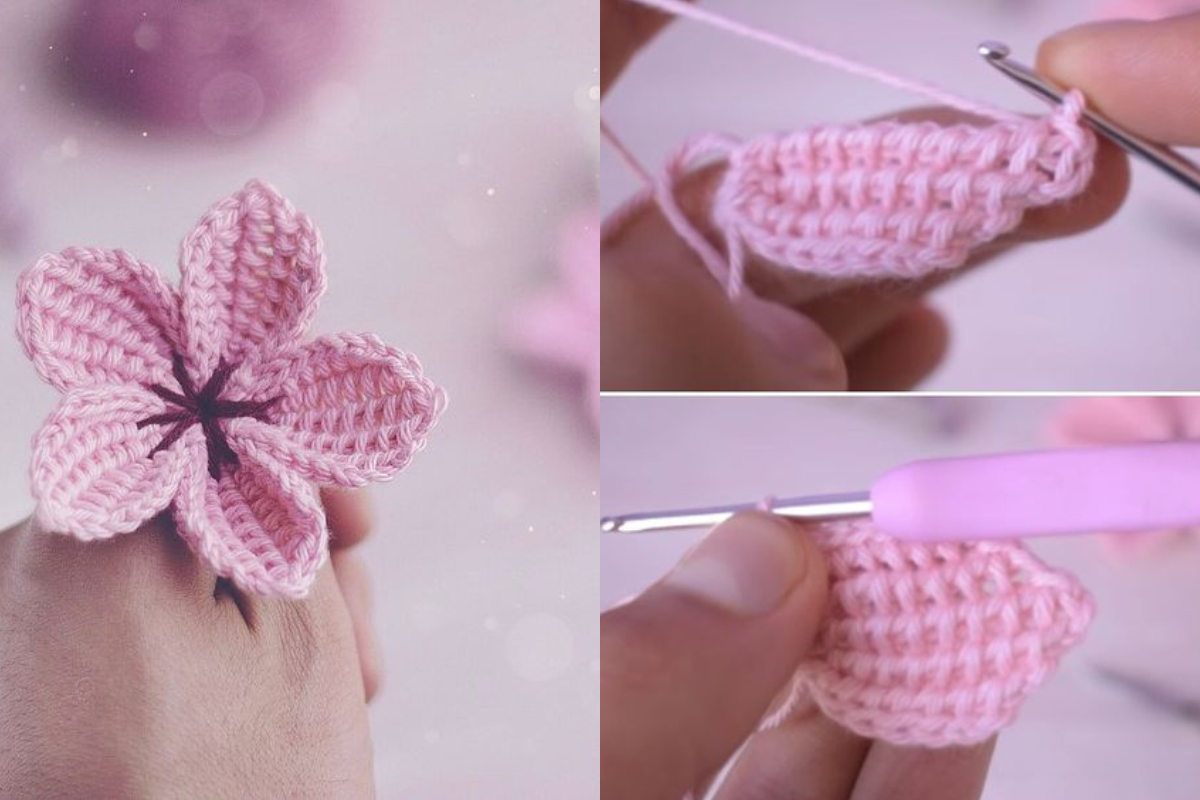
Materials and Step-by-Step Instructions for Crocheting Sakura Flowers
To crochet a sakura flower, you will need the following materials:
- Lace or fingering weight pink yarn
- Lace weight green yarn
- Lace weight dark pink yarn
- A matching crochet hook
- A yarn needle
- Scissors
The pattern suggests doubling the yarn for the flower and using a single strand for the stigma motif, creating contrast in size. The flowers are worked in the round, and the central motif is also worked in the round and then attached to the center of the crochet blossom flower.
Follow the step-by-step instructions below to create your sakura flowers:
- Start with a magic circle.
- Work through each round to form the petals.
- Finish off the flower by attaching the stigma motif.
For a more detailed guide, you can refer to the provided written instructions or watch a video tutorial for step-by-step guidance.
Magic Circle:
The magic circle technique is commonly used in amigurumi and other crochet projects to create a tight starting loop. To make a magic circle:
- Hold the end of the yarn with your fingers. Leave a tail long enough to weave in later.
- Create a loop by crossing the working yarn over the tail. Hold the intersection with your thumb and middle finger.
- Insert your crochet hook under the first strand, grabbing the second strand with the hook and bringing it through the loop.
- Chain 1 to secure the loop.
Round 1 (Petals):
In this round, you will create the first layer of petals for your sakura flower:
- Chain 3. This will count as the first double crochet stitch.
- In the magic circle, work 9 double crochet stitches. Pull the loop tight to close the circle.
Round 2 (Petals):
In this round, you will create the second layer of petals for your sakura flower:
- Chain 3. This will count as the first double crochet stitch.
- In the first stitch of the previous round, work 2 double crochet stitches.
- Work 2 double crochet stitches in each stitch around. You will have a total of 20 stitches.
Round 3 (Petals):
In this round, you will create the third layer of petals for your sakura flower:
- Chain 3. This will count as the first double crochet stitch.
- In the first stitch of the previous round, work 1 double crochet stitch.
- In the next stitch, work 2 double crochet stitches.
- *Work 1 double crochet stitch in the next stitch, then 2 double crochet stitches in the following stitch.* Repeat from * to * around. You will have a total of 30 stitches.
Attaching the Stigma Motif:
After completing the petals, you can attach the stigma motif to the center of the crochet blossom flower. Use the lace weight dark pink yarn and the yarn needle to sew the motif in place.
With these step-by-step instructions, you'll be able to crochet your very own sakura flowers. Enjoy the process and have fun experimenting with different yarn colors and variations!
Tips for Crocheting Sakura Flowers and Ideas for Using Them
When crocheting sakura flowers, it's important to use a small crochet hook and tight stitches to help the petals maintain their form. The delicate nature of cherry blossoms requires attention to detail and precision. The small crochet hook ensures that the stitches are compact, creating a realistic and beautiful flower.
To add variety and uniqueness to your sakura flowers, experiment with different yarn colors. Explore shades of pinks and whites to capture the essence of cherry blossoms. You can create a bouquet of vibrant flowers or opt for a more subtle, monochromatic palette. Let your creativity flourish as you weave various yarn hues into stunning cherry blossom creations.
Once you've completed your handmade sakura flowers, the possibilities for using them are endless. Attach them to headbands, hats, or scarves for a delicate touch of springtime. Sew them onto blankets or pillows to infuse your home decor with the charm of cherry blossoms. These crochet flowers also make lovely gifts for friends and family. Brighten up a card or add a touch of elegance to handmade crafts by using sakura flowers as embellishments. Unleash your imagination and let the beauty of sakura flowers blossom in your creative endeavors.
CHECK MORE CROCHET PATTERNS