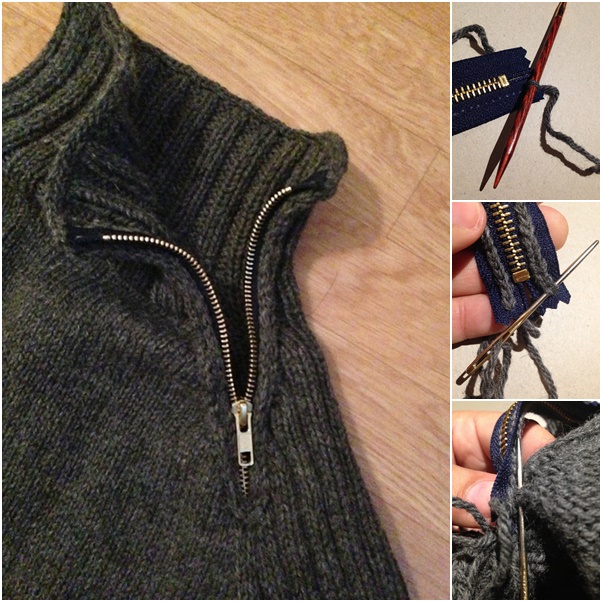
How to DIY Crochet a Zipper into Sweaters

You’ve seen or sewn zippers in many of crochet garments yourself which is like sewing a zipper into a sewn garment. But it still can be both difficult, complicated.
Did you ever try to attach a zipper in crochet way as above. It looks much natural and is a great technique for us yarn lovers to crochet zippers into sweaters, dress and skirts, boots and bags.
With this technique you do not have to worry about having the zipper being crooked or it wont make a knitting pucker etc.
It will also give you a nice seam that will be invisible from the knit side of the garment.
How to DIY Crochet a Zipper into Sweaters
Adding a zipper to a crochet sweater is a practical and stylish way to give your handmade garment a clean, modern finish.
While most crochet projects feature button closures or open fronts, learning how to DIY crochet a zipper into sweaters can add a new dimension to your crochet skills.
Whether you want to make your sweaters easier to put on, more functional, or just add a bit of flair, installing a zipper can elevate your project.

- Zipper: Choose a zipper that matches the length of your sweater opening. It can be a regular or separating zipper depending on whether your sweater opens completely.
- Crochet Hook: You’ll use a small hook (around 2.0mm to 3.5mm) for attaching the zipper to your crocheted fabric.
- Yarn Needle: For weaving in ends and securing the zipper stitches.
- Thread or Yarn: Depending on your preference, you can use matching thread or thin yarn to sew the zipper in place.
- Scissors: To trim any excess yarn or thread once the zipper is attached.
- Measuring Tape: To measure the exact length needed for the zipper and ensure it aligns correctly with the sweater opening.
Step-by-Step Guide
1. Prepare Your Zipper and Sweater
- Measure the Opening: Start by measuring the length of the opening where you want to insert the zipper. Ensure that your zipper matches this length or slightly exceeds it, as you can trim excess zipper if necessary.
- Block Your Sweater: If you haven’t already blocked your sweater, do so now. Blocking helps your stitches even out and ensures that the fabric lies flat, making it easier to install the zipper.
2. Position the Zipper
- Align the Zipper: Lay your sweater flat and position the zipper along the opening. Use pins or stitch markers to hold it in place, making sure the zipper aligns evenly on both sides of the fabric.
- Pin or Baste the Zipper: To secure the zipper before sewing, either pin it along the edge of the sweater or use basting stitches. This helps prevent the zipper from shifting as you work.
3. Crochet Along the Zipper Edges
- Attach the Yarn: Using a small crochet hook, attach the yarn to the edge of your sweater where the zipper will be sewn. You can use a slip stitch or single crochet (SC) to work along the edge.
- Work Evenly Along the Zipper: Crochet along the edge of the zipper, inserting your hook into the zipper tape and through the stitches of the sweater. Be consistent with your stitch placement for a clean, even finish. If your zipper has large holes or gaps, use these to guide your stitches.
- Crochet the Other Side: Repeat the process on the opposite side of the zipper. Make sure both sides are evenly aligned, so the zipper opens and closes smoothly.
"A small hook allows you to work through both the zipper tape and crochet fabric with ease, creating a neat attachment."
4. Sew the Zipper to the Sweater
- Secure the Zipper with Sewing: Once the zipper is crocheted in place, use a yarn needle and matching thread (or thin yarn) to hand-sew the zipper securely to the sweater. Sew along the edges of the zipper tape to reinforce the attachment, making sure your stitches are small and tight.
- Check for Functionality: Test the zipper to ensure it opens and closes smoothly without puckering or pulling on the fabric.
5. Weave in Ends and Trim Excess Zipper
- Weave in Ends: Use your yarn needle to weave in any loose yarn ends, securing them discreetly into the fabric for a polished look.
- Trim Excess Zipper: If the zipper is slightly longer than needed, carefully trim the excess from the top or bottom, ensuring you don’t damage the zipper teeth. For metal zippers, you may need pliers to remove the excess teeth before cutting.
CHECK MORE CROCHET PATTERNS