How to Knit a Poncho: Step-by-Step Guide for All Skill Levels

Ready to create a cozy and fashionable knitted poncho?
Whether you're a beginner or a seasoned knitter, this guide will take you through the process of making your very own stylish poncho. With just a few basic materials and some creativity, you’ll have a handmade garment that’s perfect for cool weather and chic layering.
Let’s dive into this DIY poncho knitting guide!
How to knit a poncho
Knit poncho patterns are not only some of my favorite knitting projects, they’re also some of my favorite autumn accessories. Knitting a poncho gives you the satisfaction of a stylish and functional garment, yet doesn’t pose as many of the difficulties and complications of a knit sweater pattern.
With no sleeves and less shaping to deal with, knit poncho patterns are a relaxing and rewarding knit. Satisfy your need to complete a larger-scale project with a knit poncho pattern.

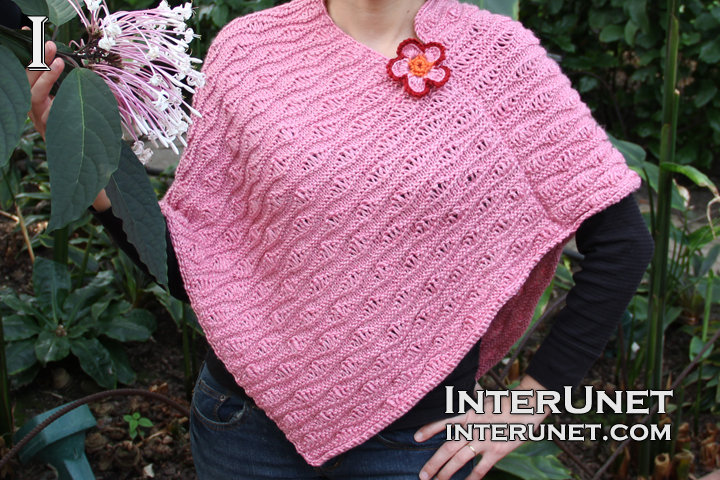
Knitting women’s top - ocean waves stitch. Knit a poncho with a flower - free pattern.
Happy weekend, everyone and of course, happy shopping! (isn’t it always?)
How to Knit a Poncho: Step-by-Step Pattern
Step 1: Choose Your Poncho Design
There are several poncho styles to choose from, but for this guide, we'll cover a simple rectangular poncho, which is perfect for all skill levels.
- Rectangle Poncho: You’ll be knitting two rectangles and sewing them together at the shoulders to create an elegant draped effect.
Step 2: Knit the First Panel
- Cast On
Start by casting on enough stitches to make the width of your poncho. For example, cast on 80-100 stitches for a wide poncho, depending on your desired size and the thickness of your yarn. - Knit the Body
Using the garter stitch (knit every row), work until the panel reaches your desired length. A typical length for a poncho is 30 to 35 inches, but feel free to adjust based on your preferences. - Optional: Add Texture
If you'd like to add texture, consider working in a rib stitch or seed stitch for a portion of the panel. This can break up the garter stitch and give your poncho a unique look. - Bind Off
Once your panel reaches the desired length, bind off loosely to avoid a tight edge.
Step 3: Knit the Second Panel
Repeat the same process for the second rectangle. This will be sewn together with the first panel to form the poncho.
Step 4: Assemble Your Poncho
- Sew the Panels Together
Lay the two rectangles side by side. Use your tapestry needle to sew along one edge of each rectangle, leaving a space at the top for your neckline. The placement of the seam will determine how the poncho drapes over your shoulders.Tip: Leave a wider neck opening for a looser, casual look, or sew closer to the edge for a more fitted style.
- Weave in Loose Ends
Once the panels are sewn together, use your tapestry needle to weave in any loose ends for a clean finish.
Adding Custom Touches to Your Poncho
"Your poncho should be as unique as you are. Adding personal touches will make it one-of-a-kind!"
- Fringe: Add fringe to the bottom edges for a bohemian vibe. Cut equal lengths of yarn, fold them in half, and use your crochet hook to attach them to the edges.
- Cowl Neck: Knit a separate cowl neck and attach it to the neckline for a cozier feel.
- Color Blocking: Knit each panel in a different color or add color blocks to make your poncho stand out even more.
- Buttons: Add decorative buttons to the shoulders or sides for a stylish finishing touch.
Learn how to knit a poncho with this easy step-by-step guide. Perfect for beginners, create a stylish and cozy poncho with simple stitches and customize it with your own unique flair!
CHECK MORE CROCHET PATTERNS