Lovely Crochet Birdie Decoration: A Fun and Charming Project(VIDEO+PATTERN)
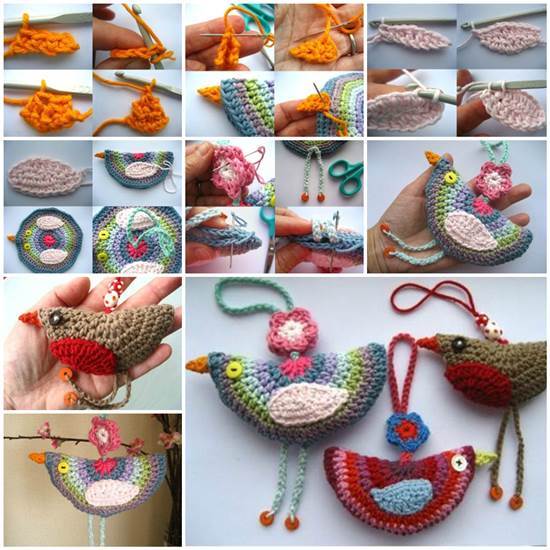
If you’re looking for a quick and delightful crochet project, crafting a lovely crochet birdie decoration is the perfect choice.
Also: Glass Jars Decorated with Crochet for Christmas
These adorable crochet birds can be used as home décor, tree ornaments, or even as a whimsical addition to gifts.
They’re easy to make, completely customizable, and a fun way to add a handmade touch to your space. Whether you’re a crochet beginner or an experienced crafter, making a crochet birdie is a creative project that allows you to play with colors, textures, and embellishments.
Little birdy decoration tutorial.
Easter is around the corner! Let’s make some lovely crochet decorations for our home. I would like to share with you this wonderful DIY project I found on the attic24 blog.
If you love crocheting, like me, you are going to love these cute crochet birdie decoration. I really like their colorful design, which is great for Easter decoration.
They are also great gifts for kids because the crochet birdies are so cute and soft for the little hands.
Head over to the attic24 blog for the full tutorial in the following link.
Materials Needed for Crochet Birdie Decoration
Before we dive into the process, here’s a list of materials you’ll need to make your crochet birdie:
- Yarn: Choose soft, lightweight yarn such as cotton or acrylic. You can use multiple colors for the body, wings, and beak.
- Crochet Hook: A 3.0mm to 4.0mm hook is typically best for creating a small, tight crochet birdie.
- Yarn Needle: For weaving in ends and attaching pieces like the wings and beak.
- Polyfill or Cotton Stuffing: To give the birdie a soft, plush feel.
- Scissors: To trim the yarn.
- Beads or Safety Eyes: For the eyes, or you can embroider them using black yarn.
Step-by-Step Guide to Crochet a Birdie Decoration
1. Create the Birdie’s Body
- Magic Ring: Start by making a magic ring with your yarn. Crochet 6 single crochets (SC) into the ring. Pull tight to close the circle.
- Increase Rounds: For the next few rounds, you’ll increase the stitch count to form the body of the bird. In the second round, work 2 SC in each stitch around (12 stitches). In the third round, work 1 SC in the first stitch and 2 SC in the next, repeating this pattern around (18 stitches).
- Continue Increasing: Continue increasing stitches in each round until your birdie reaches the desired size. For a small birdie, you might stop after 30 stitches.
- Crochet Even Rounds: Once you’ve reached the desired width, crochet several rounds without increasing. This creates the body’s length.
- Start Decreasing: After the body is the desired length, begin decreasing by crocheting SC two stitches together every few stitches until the opening is small enough to close.
- Stuff the Body: Before fully closing, stuff the birdie’s body with polyfill or cotton to give it shape.
"Stuffing the body properly ensures that your birdie has a soft and plush appearance."
2. Make the Birdie’s Wings
- Create Two Wings: To make the wings, start by chaining 6 stitches and then working back and forth in single crochet for 2-3 rows.
- Attach the Wings: After completing the wings, sew them onto the sides of the birdie’s body using a yarn needle. Make sure they’re aligned evenly on both sides.
"You can create a more dynamic look by making the wings a different color than the body or adding a fun stitch pattern."
3. Crochet the Beak
- Small Triangle Beak: For the beak, crochet a small triangle by chaining 4 stitches and working a few rows of decreasing single crochet stitches until you have a tiny triangle shape.
- Attach the Beak: Sew the beak onto the front of the birdie, right below where the eyes will go.
4. Add the Eyes
- Choose Your Method: You can either sew on small beads or use safety eyes for the birdie’s eyes. If you prefer, you can also embroider the eyes using black yarn.
- Place the Eyes: Attach the eyes symmetrically above the beak for a cute, lively expression.
"Using beads or safety eyes gives the birdie a playful sparkle, but embroidered eyes are great for a softer, more handmade look."
5. Add Finishing Touches
- Optional Embellishments: You can add embellishments like a small flower, a bow, or even tiny feet made from yarn or felt to give your birdie extra personality.
- Loop for Hanging: If you plan to use the birdie as an ornament, crochet a small loop at the top of the bird’s body to make it easy to hang.
CHECK MORE CROCHET PATTERNS