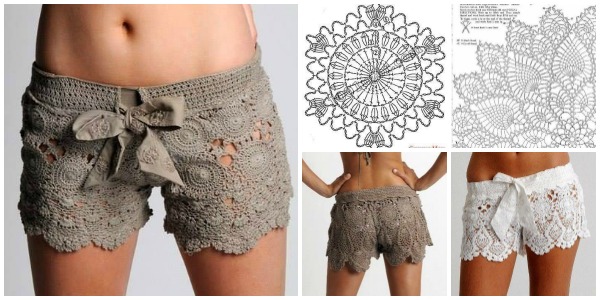
Make These Lovely Crochet Lace Shorts (Video+Pattern)

Crochet lace shorts are the perfect blend of elegance and comfort, making them a trendy and stylish addition to any wardrobe.
These delicate yet durable shorts are ideal for summer outings, beach vacations, or simply lounging around in style.
We’ll show you how to create lovely crochet lace shorts, provide tips for customization, and explore different ways to style them.
Make These Lovely Crochet Lace Shorts
I don’t think these will be the easiest things in the world to make but Fab Art DIYs tutorial has some great diagrams to help us on our way.
We will only need 4 things (and only 2 of them store bought). Grab some cotton yarn and a 1.5m crochet hook. You then need to find a lot of time and a lot of patience.
Crochet Shorts Tutorial

These would be perfect for the beach because they look a smidge see through. Other than that, I love them! Speaking of summer and beaches…how about making a crochet cover up?
Step-by-Step Guide to Crochet Lace Shorts
Step 1: Take Measurements
To ensure your crochet shorts fit perfectly, measure your waist, hips, and desired length. This will guide you in adjusting the pattern to fit your body shape.
- Waist Measurement: Measure around the narrowest part of your waist.
- Hip Measurement: Measure around the fullest part of your hips.
- Length: Decide how long you want the shorts to be—from waist to mid-thigh or longer.
Step 2: Create the Lace Panels
- Foundation Chain: Start by making a foundation chain that matches your hip measurement. This chain will be the base of your shorts and wrap around your hips.
- Chain enough stitches to equal the circumference of your hips, making sure the number of chains is divisible by the lace pattern you are using (e.g., multiples of 4 or 6).
- Work the Lace Stitch Pattern: Choose a lace stitch pattern, such as shell stitches, mesh stitches, or a combination of chains and double crochets. Work in rows or rounds, depending on the pattern you are following.
- Example of Shell Stitch: Chain 3 (counts as first double crochet), skip 2 stitches, 5 double crochets (dc) in the next stitch, skip 2 stitches, 1 double crochet in the next stitch—repeat this pattern across the row.
- Continue Working in Rounds: Once you have worked the lace stitch pattern for a few rounds, check the fit by wrapping the piece around your hips. If it’s too tight or too loose, adjust your stitches accordingly.
Step 3: Shape the Legs
- Divide the Panels for Legs: After you’ve worked the lace pattern to your desired height (around the hips and thighs), divide the piece into two sections to create the leg openings.
- Use stitch markers to mark the center front and back, and separate the fabric into two halves for the legs.
- Work Each Leg Separately: Crochet each leg in the round, working down from the hips toward the hem. Continue the lace stitch pattern or switch to a tighter stitch, like half-double crochet (hdc), for a snug fit around the thighs.
- Finish the Hem: Once you’ve reached your desired length, finish each leg with a decorative edge, such as a picot or scalloped border.
Step 4: Add the Waistband
- Crochet Waistband: You can either crochet a simple waistband by working single crochet (sc) stitches around the waist or add an elastic waistband for more stretch.
- Elastic Band (Optional): If you’re adding an elastic waistband, measure a piece of elastic to fit your waist, and sew it onto the inside of the shorts. Fold the top edge of the shorts over the elastic and sew in place to create a neat finish.
Step 5: Finish and Weave in Ends
- Sew the Seams: If you worked the shorts in separate panels, sew the front and back seams together with a tapestry needle.
- Weave in Ends: Use your tapestry needle to weave in any loose ends for a clean, polished look.
CHECK MORE CROCHET PATTERNS