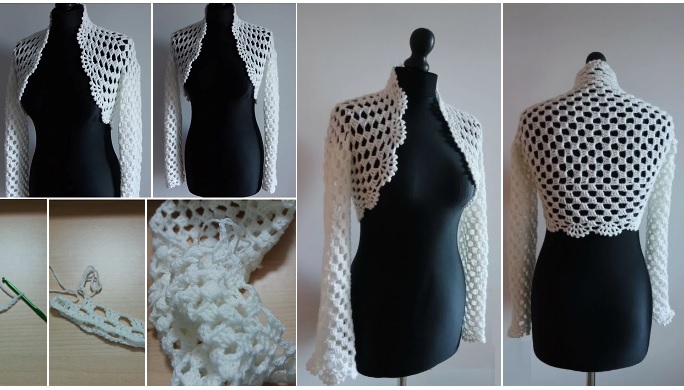
Crochet Bolero Jacket

This jacket design has become pretty popular present time. The design is often called a bolero one and even though I have no idea what it means I will still call it the way people use to.
The tutorial for this beautiful jacket is easy to understand and follow. At the end we are going to have ourselves a brand new bolero jacket.
Now it is hard to wear it on every occasion but it could very well be a good complimentary piece to a shirt or maybe to swimming top either.
Crochet Bolero Jacket
The Crochet Bolero Jacket is a versatile, stylish garment that adds elegance to any outfit. Perfect for layering, a bolero can be worn over dresses, tops, or even as a light cover-up on cooler evenings.
This guide will walk you through the materials, techniques, and steps needed to create your own crochet bolero jacket, along with styling tips and customization ideas

Step-by-Step Instructions: How to Crochet a Bolero Jacket
1. Start with the Back Panel
The back panel is usually a simple rectangle, making it a great place to begin.
- Foundation Chain: Measure the width of your back and chain a length that matches this measurement. For example, 60-80 chains might be typical for a medium-sized bolero.
- Work in Pattern: Choose a stitch pattern, such as double crochet (dc), half double crochet (hdc), or shell stitch. Work row by row, repeating the stitch pattern until the panel reaches the desired height.
- Fasten Off: Once you have completed the back panel, fasten off and leave a tail for sewing if needed.
Pattern Tip: For a lacy, openwork look, try a mesh or lace stitch pattern to make the bolero light and airy.
2. Create the Front Panels
The front panels are also rectangles but usually smaller than the back panel.
- Foundation Chain: Chain a length that covers half the width of the back panel to ensure symmetry.
- Follow the Same Pattern: Work the same stitch pattern as you did for the back panel, repeating rows until the front panels are the same height as the back panel.
- Neckline Shaping (Optional): For a rounded or V-neck shape, start decreasing near the top edge to create a slight curve.
Neckline Tip: A rounded neckline is softer, while a V-neck gives a sharper, more structured look to the bolero.
3. Crochet the Sleeves
The sleeves can be as short or long as you like, depending on your preference.
- Foundation Chain: Measure around your upper arm and chain a length that fits comfortably.
- Increase for Shaping: As you work in rows, gradually increase a stitch at each end to create a wider sleeve opening.
- Length of Sleeves: Crochet until the sleeve reaches your desired length, whether it’s a short cap sleeve or a full-length sleeve.
Sleeve Style: Experiment with puffed sleeves, flared cuffs, or ribbed edges for added texture.
4. Assemble the Bolero Jacket
Once all pieces are complete, it’s time to assemble the bolero.
- Join the Shoulder Seams: Using a whip stitch or slip stitch, join the top edges of the front and back panels at the shoulders.
- Attach the Sleeves: Align the sleeves with the armholes and sew them in place, ensuring the stitching is even.
- Sew the Side Seams: Join the side seams from the bottom of the sleeve to the bottom of the bolero.
Assembly Tip: Use a yarn needle and the same yarn to ensure the seams are both strong and invisible.
5. Add Edging and Finishing Touches
The final step is adding any additional details or decorative edging.
- Single Crochet Edging: Add a single crochet edging around the neckline, sleeve cuffs, and bottom hem to give the bolero a clean, finished look.
- Lace or Shell Edging: For a more decorative effect, use a lace or shell stitch along the edges.
- Button or Tie Closure: Add a small button, tie, or hook closure at the front if desired.
You may know better ways to wear it off. Either way, the tutorial is something you should check out.
CHECK MORE CROCHET PATTERNS