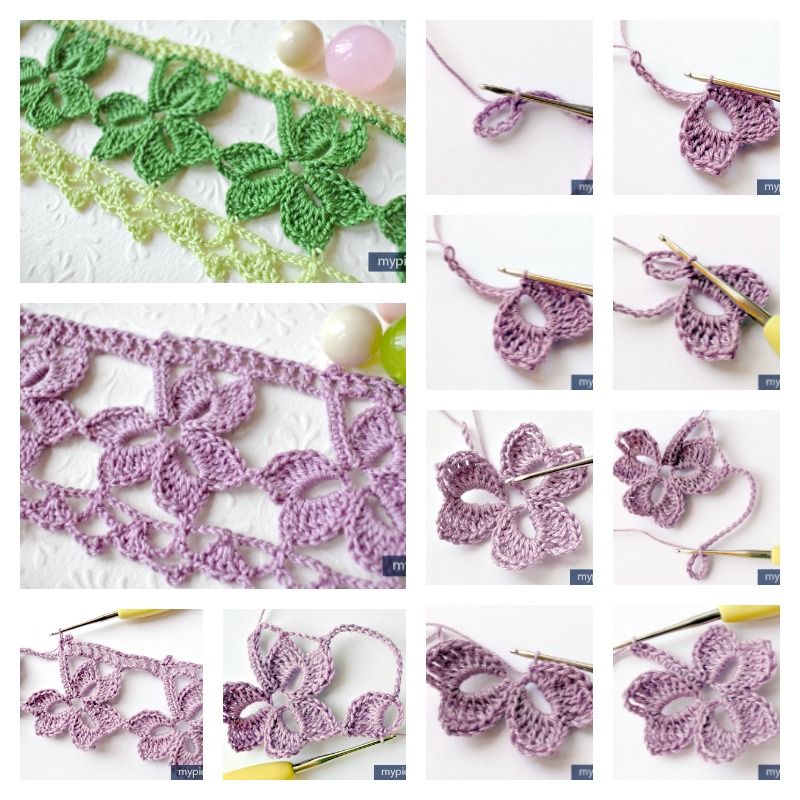
Crochet Trefoil Lace Edging with Free Pattern

Crochet lovers, do you ever find yourself with a finished project, but it just doesn’t look complete?
Also: 20 Lace Crochet Square Diagrams
You stare at it and can’t figure out what needs to be done with it. Maybe the missing part is to add crochet edging to complete your pattern. If so, here is the beautiful free pattern to crochet trefoil lace edging.
Simple crochet edging can be added to just about any project (clothing, linens, pillowcases, baby blankets, afghans, scarves etc) out there. And with the abundance of beautiful crochet threads in many different colors, you can make edgings and insertions in any color you choose. It makes your design look complete and a bit more sophisticated.
Crochet Trefoil Lace Edging
Check out the link below photo to get the free pattern to learn how to Crochet Trefoil Lace edging.

When it comes to intricate crochet designs, the trefoil lace edging stands out as a timeless classic.
This elegant pattern, characterized by its three-leaf clover motif, adds a touch of sophistication to any fabric edge. Whether you’re a seasoned crocheter or a novice looking to expand your repertoire, mastering the trefoil lace edging is a rewarding endeavor.
How to Crochet Trefoil Lace Edging (Step-by-Step Tutorial)
Step 1: Attach Yarn and Create the Foundation Row
- Attach Yarn:
- Start by attaching the yarn to the edge of your project where you want to add the lace.
- Single Crochet Foundation:
- Work single crochet (SC) stitches evenly along the edge. This will be your foundation row for the lace, providing a stable base.
- Chain 3:
- At the end of the row, chain 3 and turn your work.
Tip: Keep your stitches even along the edge, as this will make the lace pattern consistent and easier to work with.
Step 2: Create the First Loop of the Trefoil
- Chain 5:
- Chain 5 stitches to form the first part of the trefoil petal.
- Double Crochet Cluster:
- Work 3 double crochet (DC) stitches into the base of the chain. This creates a small cluster that forms one petal.
- Chain 5 Again:
- Chain 5 more stitches and slip stitch into the single crochet where you started the cluster to secure the first petal.
Note: Each petal of the trefoil should look like a small loop. Adjust the number of chains if you want larger or smaller loops.
Step 3: Complete the Trefoil Cluster
- Chain 3:
- Chain 3 stitches to begin the next petal.
- Repeat Cluster:
- Repeat the double crochet cluster by making 3 DC stitches into the base of the chain.
- Chain 5 Again:
- Chain 5 stitches and slip stitch into the same starting point to complete the second petal.
- Make the Final Petal:
- Repeat the process once more to create a third petal. This completes one trefoil cluster.
Step 4: Continue with Trefoil Lace Edging Across
- Skip Stitches:
- Skip a few stitches along the foundation row (usually 2–3) and start a new trefoil cluster in the next stitch.
- Repeat Trefoil Pattern:
- Repeat the process for each trefoil, creating clusters across the edge of your project.
- Turn and Chain:
- When you reach the end of a row, chain 3, turn, and continue working additional rows if desired.
"Each trefoil adds a charming, clover-like cluster to your edge, creating a beautiful, lacy effect."
Step 5: Fasten Off and Weave in Ends
- Finish the Last Stitch:
- After your final trefoil, fasten off by pulling the yarn through the last loop.
- Weave in Loose Ends:
- Use a tapestry needle to weave in any loose ends for a clean, professional finish.
Note: Weaving in ends carefully will keep the lace secure and prevent unraveling, ensuring your edging lasts.
The Charm of Trefoil Lace Edging
Trefoil lace edging is not just about aesthetics; it embodies the essence of patience and precision. Here’s why this pattern is beloved by crocheters worldwide:
- Elegance: The trefoil design adds a delicate, lacy finish to any project, making it perfect for heirloom pieces.
- Versatility: It can be used on a variety of items, from tablecloths to baby blankets, and even as a decorative trim on clothing.
- Skill Enhancement: Creating this edging helps improve your fine motor skills and pattern-reading abilities.
Discover the elegance of crochet trefoil lace edging with our detailed guide. Perfect for adding a touch of sophistication to any project. Learn more now!"
With these tips and detailed steps, you’re well on your way to mastering the crochet trefoil lace edging. Happy crocheting!
CHECK MORE CROCHET PATTERNS