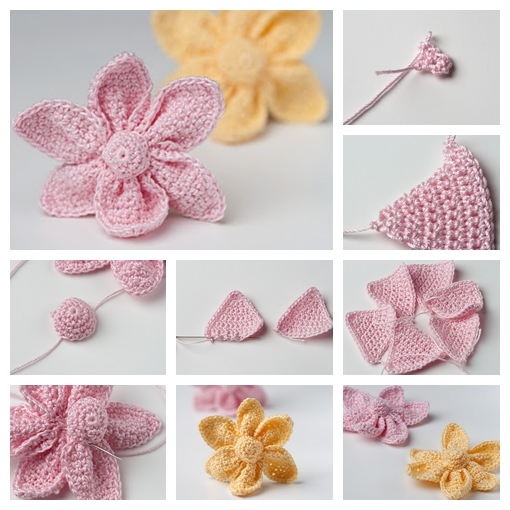
DIY Crochet Cute Little Flower

Crocheting a cute little flower is a fun, quick project perfect for beginners and experienced crocheters alike.
These delicate flowers can be used to decorate a variety of items, from hats and scarves to blankets and bags.
Whether you're adding a floral touch to your home décor or creating a sweet embellishment for a gift, learning how to make a DIY crochet cute little flower is an essential skill that opens up a world of creative possibilities.
DIY Crochet Cute Little Flower
This crochet little cute flower is so pretty ,and easy ,fun to make !
In this guide, we’ll walk you through the steps to crochet your very own adorable flower, with tips on how to customize colors, add layers, and make each one unique.
Change it up with different colors for the headband , hair pin,brooch , other fashion accessories , or any decoration . Enjoy !

DIY Crochet Cute Little Flowers
Before you begin, gather the following materials:
- Yarn: Any type of yarn will work for this project, but for small flowers, it’s best to use cotton, acrylic, or a lightweight yarn. Choose a color that matches your project or go for bright, bold tones to make the flower pop.
- Crochet Hook: Depending on your yarn, use a crochet hook size between 2.5mm to 4.0mm.
- Yarn Needle: For weaving in ends after your flower is complete.
- Scissors: To trim yarn after you finish the flower.
How to Crochet a Cute Little Flower
1. Start with a Magic Ring
- Make a Magic Ring: The magic ring technique is a great way to start a crochet flower because it allows the center to be tightly closed. Wrap the yarn around your fingers to form a loop, insert the hook, and pull through to create the ring.
- Chain 2 Stitches: After creating the magic ring, chain 2 stitches to begin your first petal.
2. Create the Flower Petals
- Double Crochet into the Ring: Work 5 double crochets (DC) into the magic ring. These stitches will form the first petal of your flower.
- Slip Stitch: After completing the 5 double crochets, make a slip stitch (SL ST) into the ring to anchor the petal.
- Repeat for Each Petal: Continue repeating the process of 5 double crochets followed by a slip stitch until you have 5 or 6 petals. The exact number of petals depends on the size you want your flower to be.
- Close the Magic Ring: Once all the petals are made, pull the tail of the magic ring tightly to close the center of the flower.
- Slip Stitch to Finish: After making the last petal, finish the flower by slip stitching into the base of the first petal. Fasten off and leave a long tail for sewing or weaving in.
Customize the Flower
- Add Extra Rounds: If you want a larger flower, add an additional round of petals by crocheting into the spaces between the first round’s petals. Use half-double crochets (HDC) or treble crochets (TC) for bigger, fuller petals.
- Layer Multiple Flowers: To create a 3D effect, crochet a second, smaller flower in a contrasting color and sew it onto the first one.
- Embellish with Beads or Buttons: Add a button, bead, or small gem to the center of the flower for extra flair.
Crocheting a DIY cute little flower is a quick, satisfying project that offers endless creative possibilities.
Whether you’re using them to accessorize clothing, decorate gifts, or create beautiful home décor, these little flowers are versatile, customizable, and easy to make.
With just a few simple steps, you’ll have a garden of crochet flowers in no time. Grab your yarn and hook, and start crocheting your own little floral masterpiece today!
CHECK MORE CROCHET PATTERNS