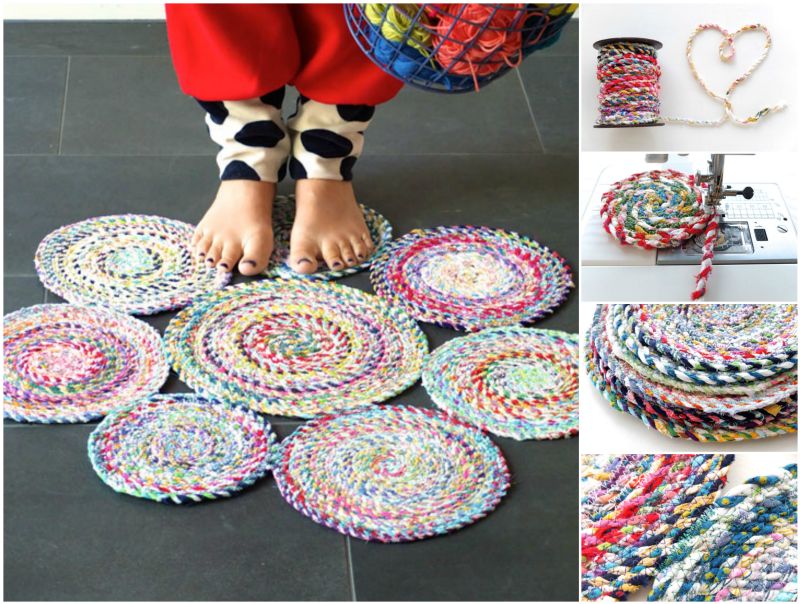
DIY Fabric Twine Spiral Mat: Upcycle Your Scraps into Beautiful Home Decor

Looking for a creative, eco-friendly project that uses up fabric scraps and adds a personal touch to your home?
Also: Discover Free Crochet Rug Patterns | DIY Home Decor
A DIY fabric twine spiral mat is the perfect way to transform leftover fabric into something both beautiful and functional.
These mats are not only eye-catching but also durable and versatile. Whether you use it as a placemat, rug, or decorative centerpiece, this project is a fantastic way to upcycle and give new life to old textiles.
DIY Fabric Twine Spiral Mat (Video)
It’s time to get all our old T-shirts, fabric scraps, or quilts whatever to make this fun and colorful spiral rug/mat (sitting mat for spool is perfect), it looks so cute and “scrappy”.
You can make as large as you can, with your own creation of the pattern.
In this guide, you’ll learn how to make your own fabric twine spiral mat using simple materials and easy-to-follow steps. We’ll walk you through the entire process, from making the fabric twine to assembling the spiral mat, and share tips for customization.
Let’s get started on this satisfying DIY project!

Why Make a DIY Fabric Twine Spiral Mat?
- Eco-Friendly: This project allows you to repurpose old fabric, making it a sustainable and environmentally friendly craft.
- Unique and Customizable: You can choose different colors and patterns, making each mat one-of-a-kind.
- Easy and Fun: Suitable for beginners, this project requires basic sewing skills and minimal tools.
- Functional Decor: These mats can be used as trivets, placemats, rugs, or even decorative wall hangings.
How to Make a Fabric Twine Spiral Mat
1. Create the Fabric Twine
- Cut Fabric Strips: Start by cutting your fabric scraps into long strips, about 1-2 inches wide. The length can vary, but longer strips will require less joining later.
- Twist the Strips into Twine: Take two strips of fabric and tie them together at one end with a knot. Begin twisting the two strips tightly together, forming a strong piece of twine. As you twist, periodically wrap the twine around itself to keep it tightly wound.
- Join New Strips: When you reach the end of one strip, overlap it with another strip and continue twisting. You can sew or knot the ends together to secure them.
- Continue Until You Have Enough Twine: Repeat this process until you have enough fabric twine to make the size of the mat you desire. For reference, a small placemat may require 10-20 feet of twine, while a larger rug may need more.
2. Start the Spiral
- Make a Tight Coil: Begin by coiling the end of your fabric twine tightly to create the center of the spiral. Keep the coil snug and flat as you work.
- Sew the Coil Together: Once the coil is about 2-3 inches in diameter, sew across the coil using a zigzag stitch on your sewing machine or by hand. This will secure the center and prevent it from unraveling.
- Continue Coiling and Sewing: As you coil the twine, continue sewing around the edges, attaching each new round of twine to the previous one. Be sure to keep the mat flat as you work, adjusting the coil to maintain an even spiral shape.
3. Build the Spiral Mat
- Expand the Spiral: Continue coiling and sewing, gradually building the mat outwards. As the spiral grows, check that it stays flat and doesn’t warp or curl up.
- Adjust the Twine as Needed: If the spiral starts to buckle, gently adjust the tension of your twine. You can also add extra stitches in certain areas to help the mat lay flat.
- Finish the Edge: When your mat reaches the desired size, finish the edge by trimming any excess fabric and securely stitching the last bit of twine to the mat. You can add a decorative stitch around the edge for a polished look.
Creative Customization Ideas
- Mix and Match Fabrics: Use a variety of fabric colors and patterns for a colorful, eclectic look. Alternating between solid and patterned fabrics creates visual interest.
- Add a Border: Finish the edge of your mat with a contrasting fabric or a crochet border to give it a unique finishing touch.
- Incorporate Decorative Stitches: Use decorative stitches in contrasting thread colors to add texture and flair to your mat.
- Play with Sizes: Make small coasters, medium-sized placemats, or large area rugs using the same technique, adjusting the amount of fabric twine accordingly.
CHECK MORE CROCHET PATTERNS