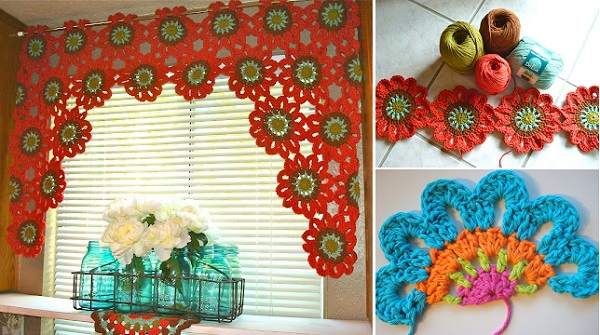
DIY Flower Power Valance Tutorial
Crocheting may seem complicated, but once you have a pattern and an explanation for each step, the whole thing seems a lot easier. One tip that can help you when crocheting is to gather with your friends and try different patterns together.
This way each one of you can contribute with ideas and helpful observations and you will be able to figure out new pattern much easier. So next time, you feel like doing a crochet project, try this flower pattern to create a cute flower valance for your windows. If you like the flower power style and hippie movement, then you will love this pattern.
You will find the step by step decoration below. This valance would also be a nice gift for someone special as it is a beautiful and colorful item. Read more details in the link below.
DIY Flower Power Valance Tutorial
Looking for a way to inject some **vibrant energy** into your home décor? A **DIY Flower Power Valance** might just be the perfect touch!
With this easy-to-follow tutorial, you’ll be able to create a **colorful, handmade valance** that channels the playful, bohemian vibes of the '60s and '70s.
Whether you’re a seasoned crafter or new to DIY projects, this guide will show you how to bring a touch of floral magic to any window in your home.

You only need some brightly colored thread and you can start crocheting your flower power valance. Make sure to choose colors that match the rest of your room and the decoration and start crocheting.
Fabric Flower Tutorial
- Draw flower shapes on your fabric using a stencil or freehand.
- Cut out your flowers carefully.
- If you want more depth, layer smaller flower shapes on top of larger ones and secure with fabric glue or sew them together.
- For added texture, sew or glue beads or buttons into the center of the flowers.
Pro Tip: Mix crocheted and fabric flowers for a whimsical, textured look!
2. Prepare the Valance Base
Now that your flowers are ready, you need to create the base for your valance. You can either crochet a simple chain garland or use a strip of fabric as the base.
- For a crochet base: Chain long enough to fit the width of your window, and make sure to leave extra for draping.
- For a fabric base: Cut a strip of fabric about 5-7 inches tall and long enough to fit your window. Hem the edges for a neat finish using a sewing machine or iron-on hemming tape.
3. Attach the Flowers
Time to make your flowers bloom on the valance! There are several ways to attach the flowers depending on your material:
- Crocheted flowers: Use a tapestry needle and yarn to stitch your flowers onto the base. Space them evenly or create clusters for a fuller effect.
- Fabric flowers: Sew or glue your fabric flowers onto the base, adding layers and textures as you go.
“A mix of bold colors, layered textures, and playful flower shapes will give your valance a true flower power vibe!”
4. Hang the Valance
Once your flowers are attached, it’s time to hang your flower power valance. Use a curtain rod, and if you crocheted a chain, simply drape the valance over the rod. For a fabric base, create a loop or use curtain clips to attach it securely.
CHECK MORE CROCHET PATTERNS